The theme for this month’s Art Elements design challenge was gothic. Gothic architecture is something I know practically nothing about. According to the interwebs, it’s characterized by pointed arches, stained glass windows with elaborate tracery (yeah, I didn’t know that term until Google explained it to me), and flying buttresses. Think Canterbury Cathedral and Notre-Dame de Paris. Gothic fiction, on the other hand, is a genre with which I am very familiar. It’s characterized by the supernatural and horror, with elements of dangerous or tragic romance. Think Mary Shelley, Bram Stoker. Edgar Allen Poe, and H.P. Lovecraft. My designs this month were inspired more by gothic fiction than architecture.
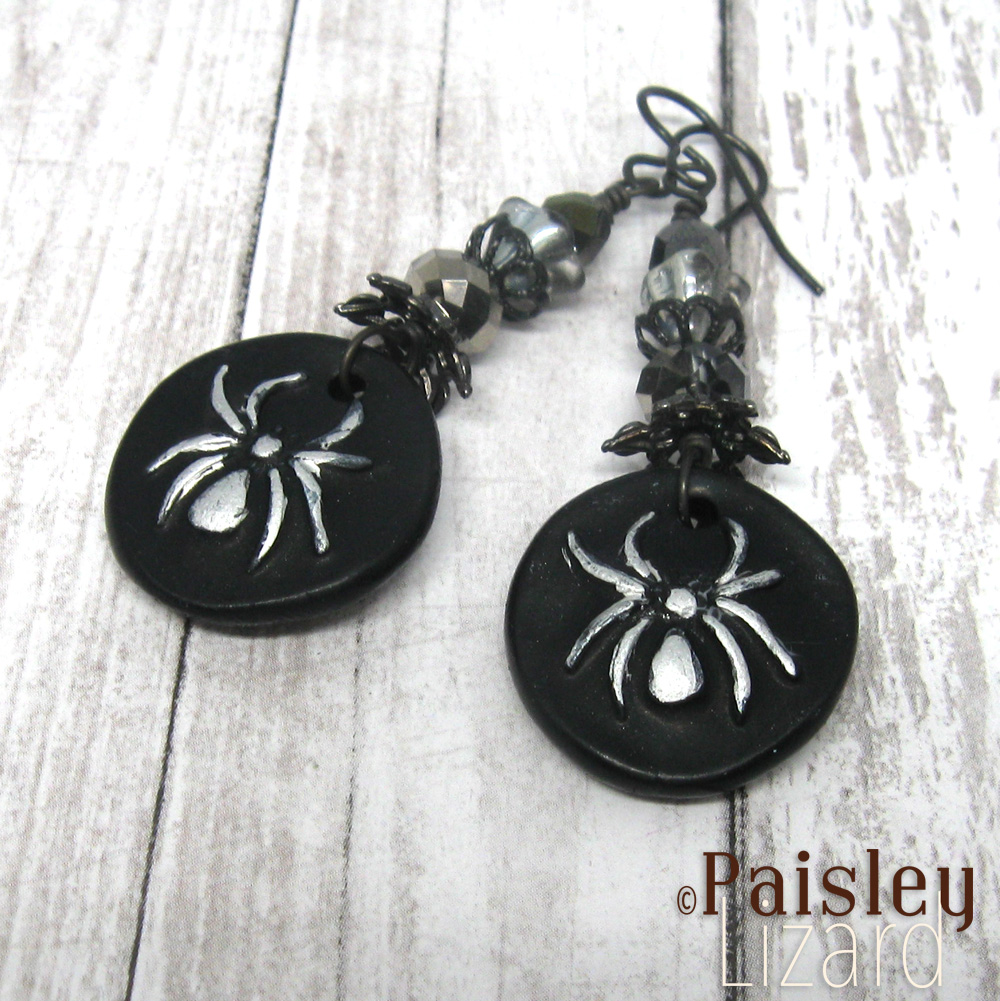
About a week before the theme was announced, I made these “Gothic Spider” earrings. I was either having a precog moment, or it was just a seasonally appropriate coincidence. The spider charms are polymer clay. I used a silver leafing pen to highlight the spider shapes on the black clay disks. The charms are paired with stacks of silver and black glass beads and black metal bead caps. I call them “gothic” because of the black on black colorway and “creepy” (to some) spiders. But the bead stacks do make sort of a pointed spire, so maybe there’s some architectural gothic in there too.
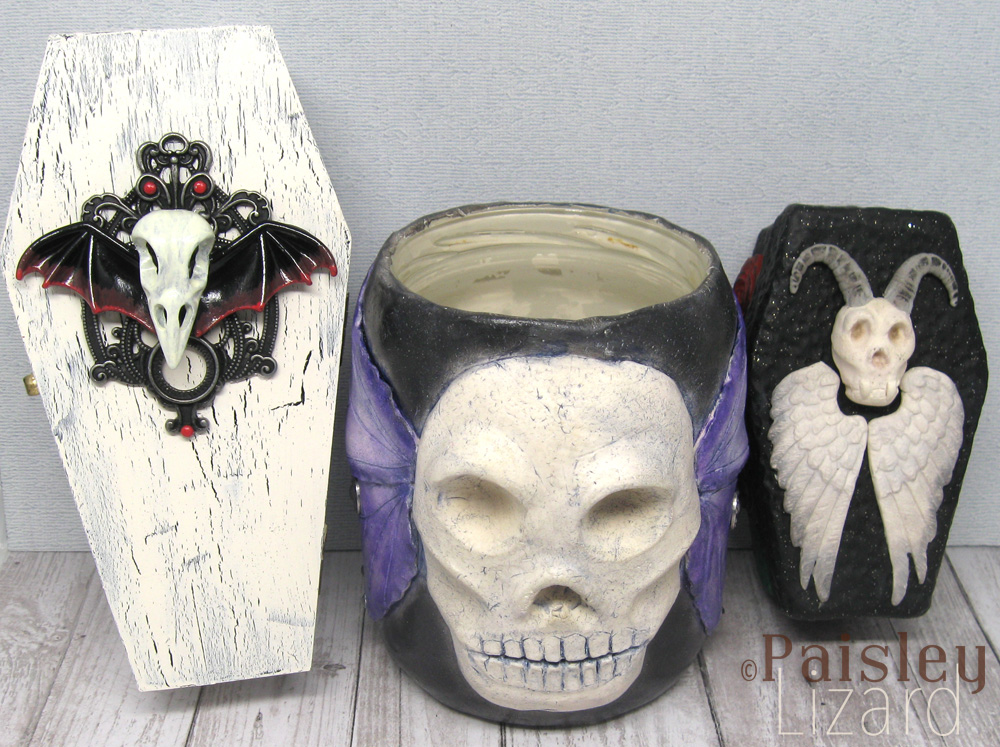
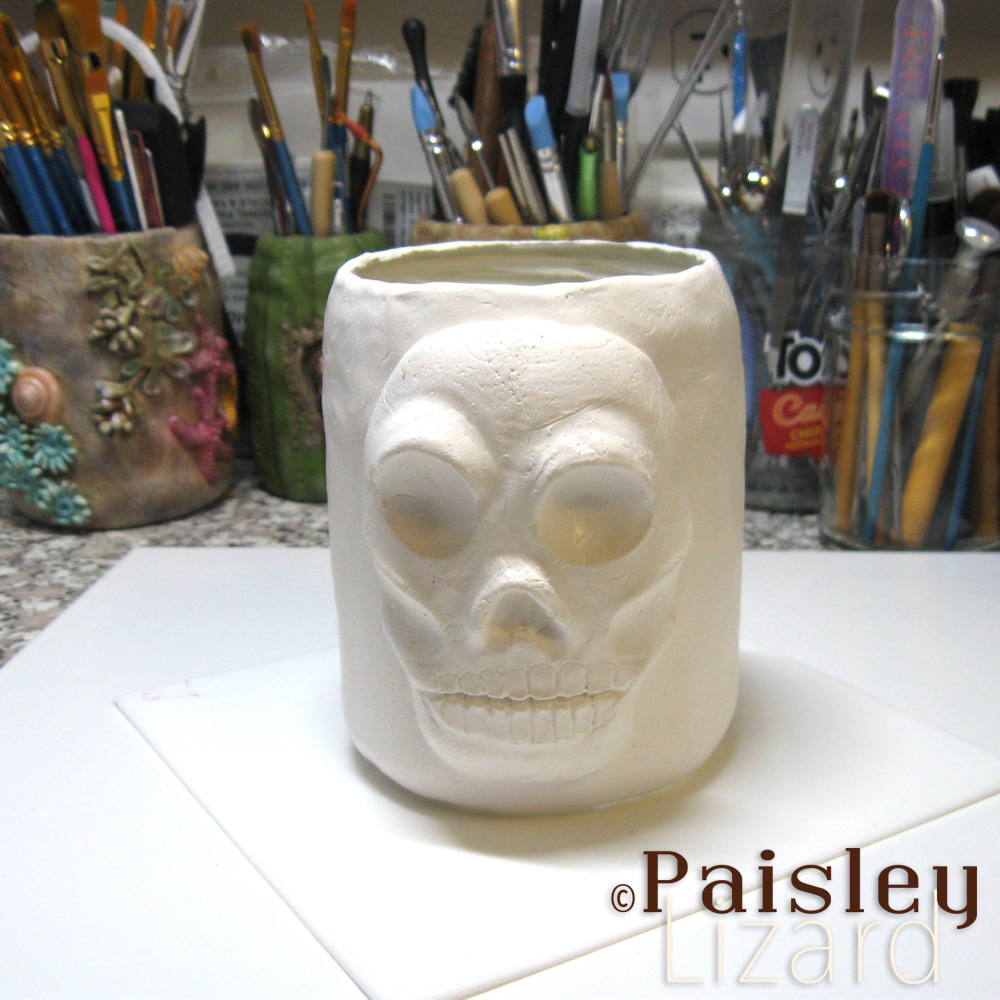
The first thing I thought of for the theme – after it was announced – was skulls. Skulls are not, as far as know, a feature of gothic architecture. But they are gothic as a design element if your inspiration is gothic fiction. I had this proto-idea to sculpt a skull-shaped planter from polymer clay, using a repurposed glass jar as the foundation. I quickly realized I didn’t have enough clay to make a full skull shape that large. There’s sort of a pandemic-related polymer clay shortage. Or at least, stocks of white clay have been hit or miss for me the last few months. So, I scaled back the idea from a hollow skull to just a skull in relief.
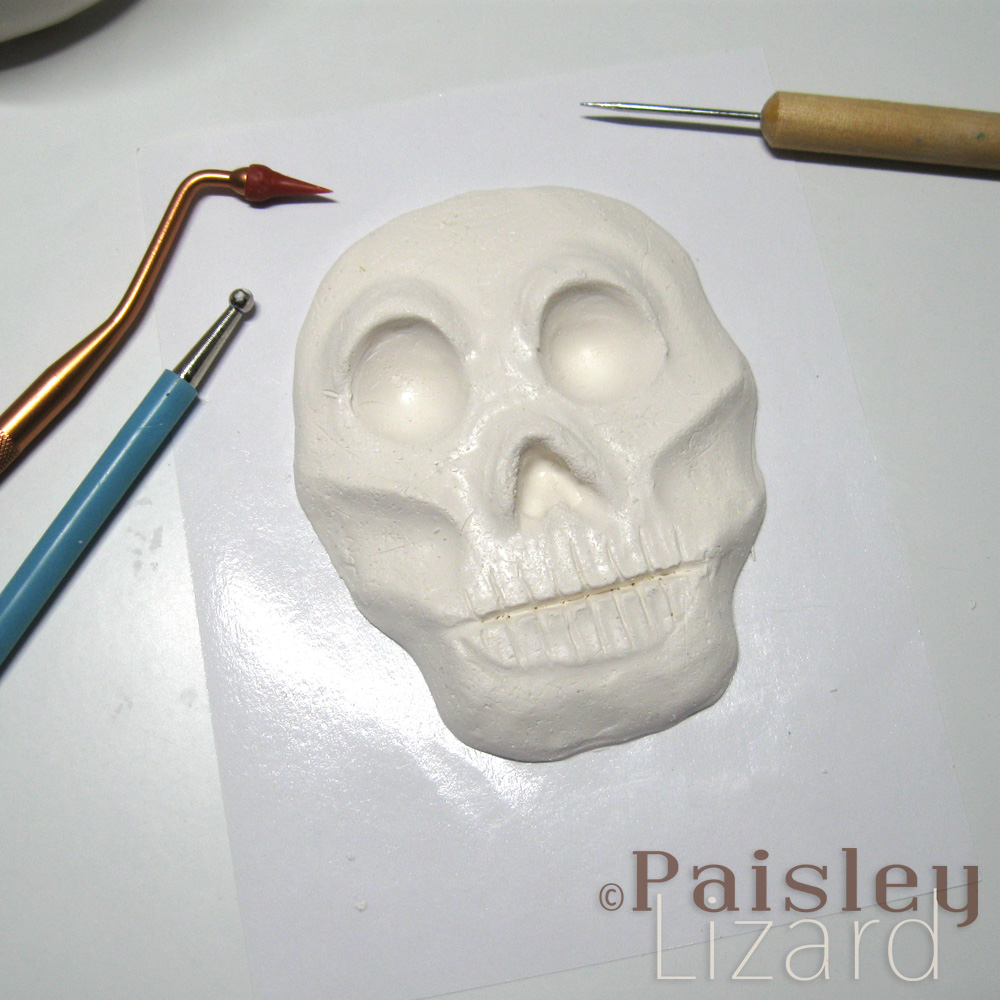
After covering the jar in a base layer of clay and sculpting the skull separately, I knew I needed more of a design plan for this planter. The skull covered about a quarter of the outside of the jar. What to do with the remaining circumference? I let the piece sit overnight while I contemplated ideas. One idea I kept coming back to involved the death’s-head hawkmoth. But the skull was too large to incorporate into the thorax of a moth on the jar and I didn’t want to start over.
Plus, by this time I had wings firmly on the brain and they were flapping away at me. To shut them up, I put some onto the jar on either side of the skull. I didn’t plan well. Again. The wings weren’t quite large enough to meet in the back, leaving a gap that called out for a smaller design element. What goes with skulls and wings? A crescent moon and star, of course.
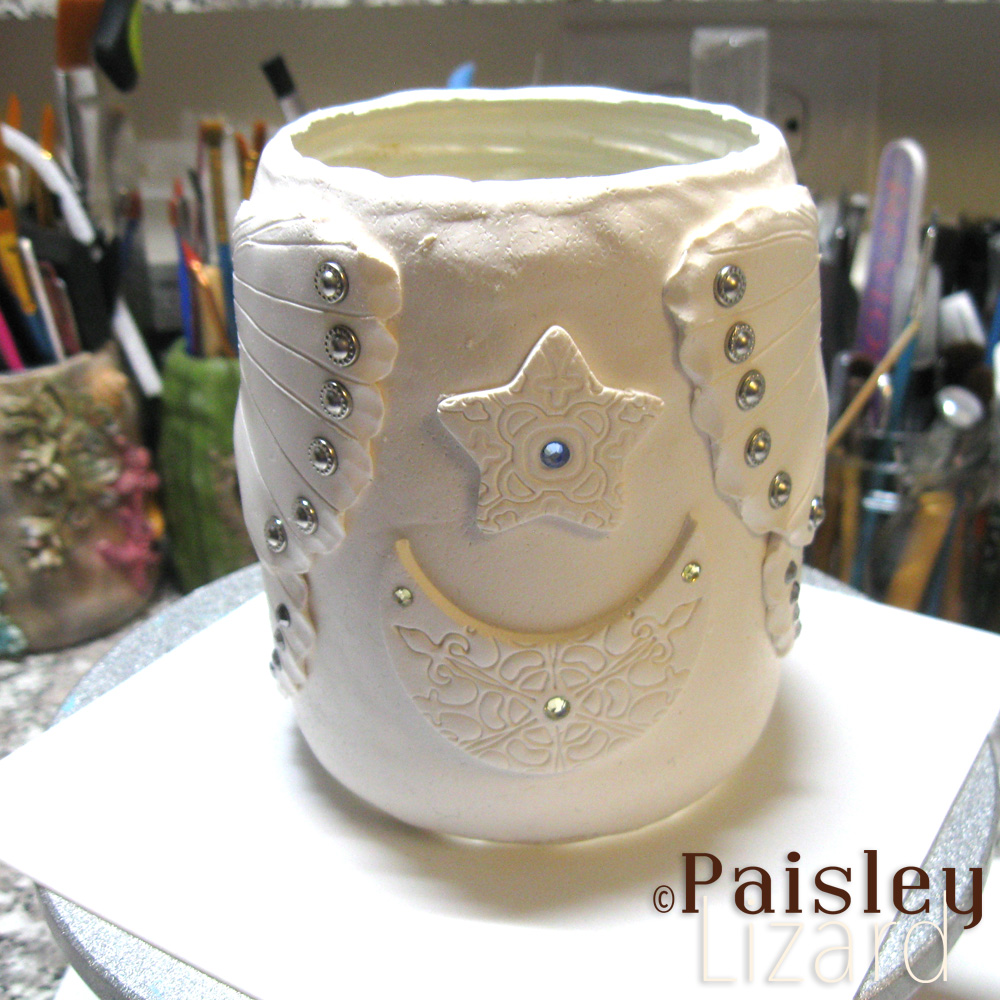
Having filled in sufficient space on the jar with skulls and wings and whatnot, I had to decide on color. The skull was going to stay off-white, naturally, with some “aged” darker spots. And the background would be black, like a night sky. Of course, the moon would be golden yellow and the star shining silver. But what about those wings? I contemplated several colors while looking at images of actual moth wings. In the end, I went with purple. Because …it’s purple. Did you know there are purple moths? I did not until Google told me. And now I am obsessed with the idea of purple moths.
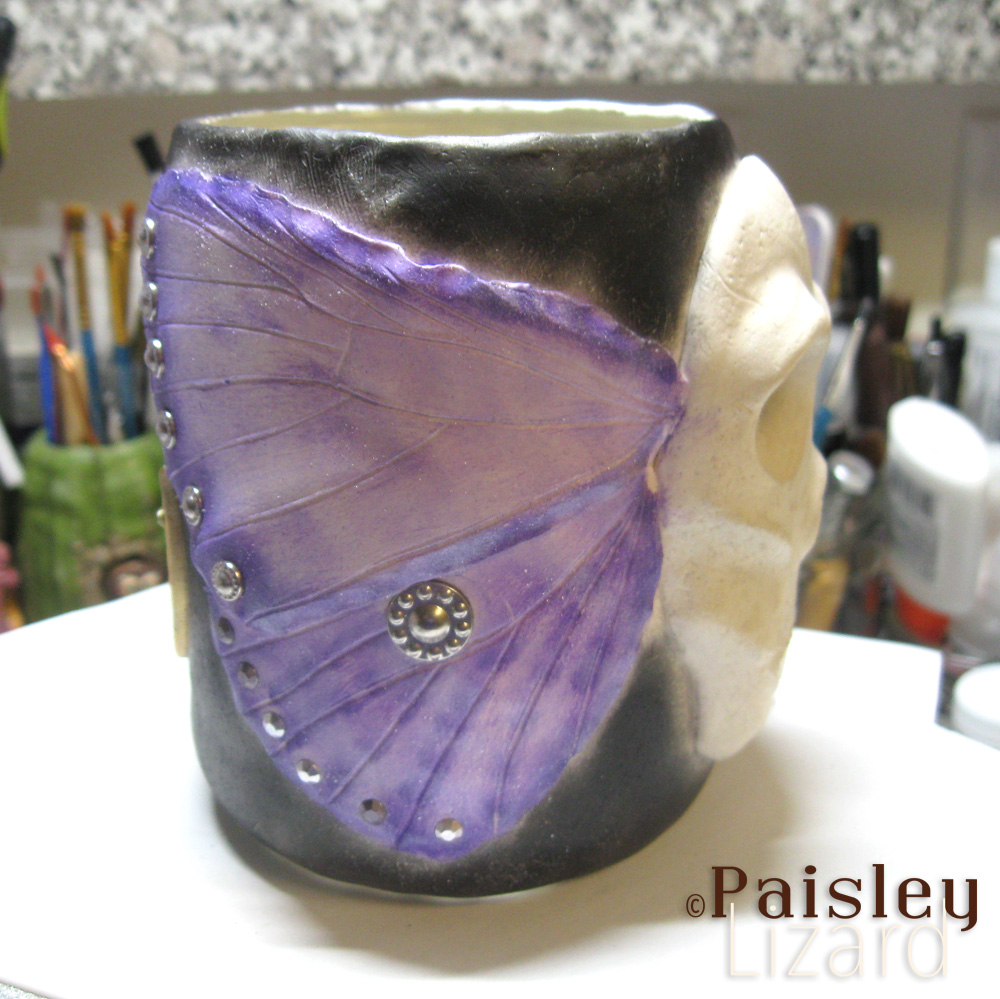
On a last minute whim, I pushed some Hotfix crystals and studs into the raw clay before I painted it. I’ve used Hotfix crystals with raw clay for years. The adhesive cures with the clay and forms a secure bond for a nice bit of sparkle. This was the first time I’ve used the metal studs though and I was mildly disappointed to see glue seepage when I removed the piece from the oven. Turns out the metal studs are hollow and filled with glue, whereas the crystal studs are flat back with just a dab of glue. A little dab is plenty for a secure connection, but a dollop will result in visible glue-goo.
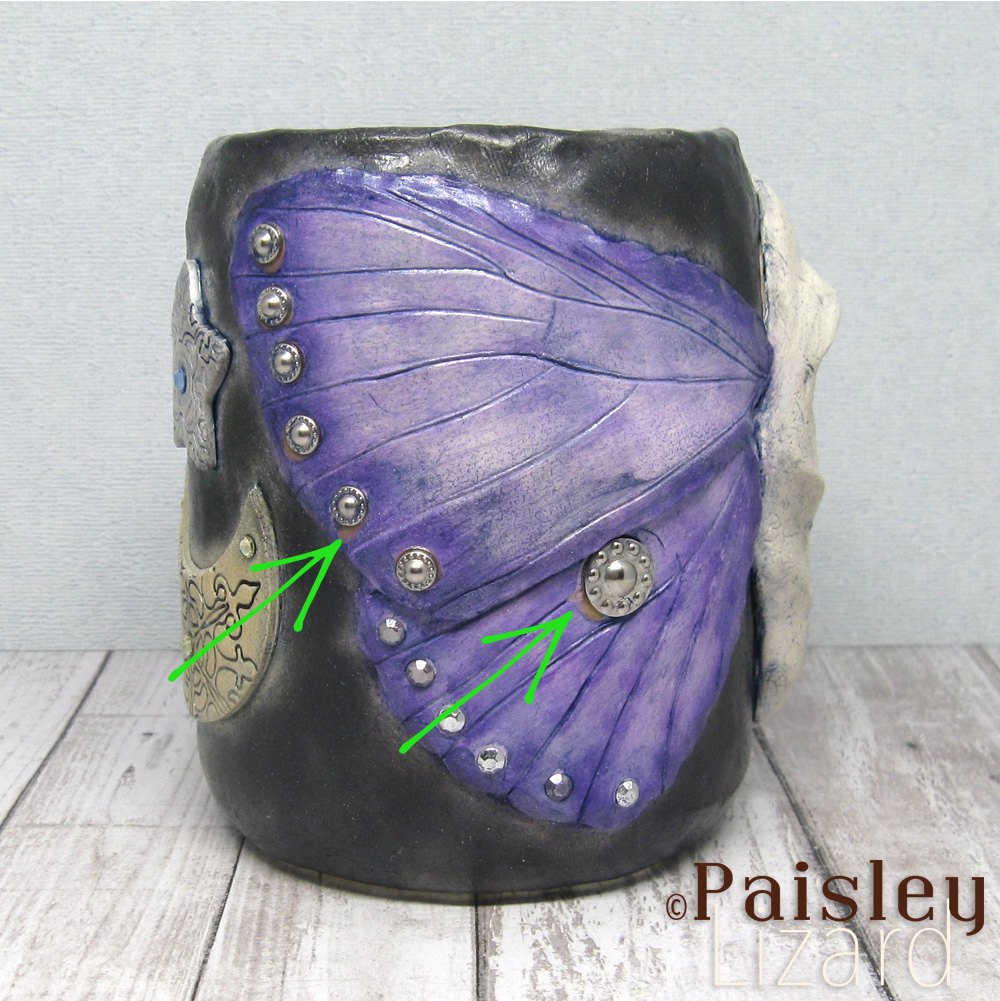
All in all, the skull planter is not awful and the design came together in the end. But it could have been better with more thought and planning. So I’ll consider this a prototype of the design. The good news is, I have lots and lots of these jars available to try again. Like, seriously …lots. They come filled with salsa, and I go through about a jar a week. The bad news is that I am likely to be distracted by some other challenge theme or design idea and never revisit this one. I’m fickle that way.
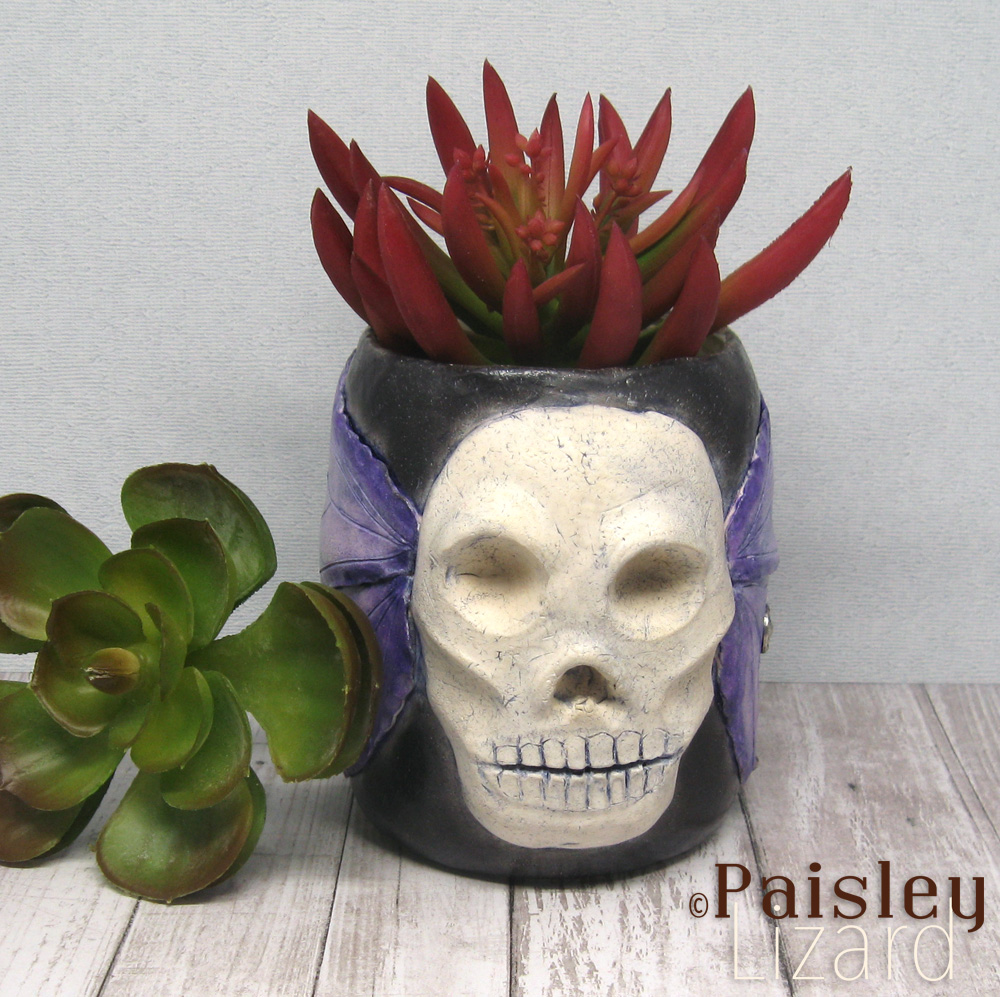
Here’s a funny observation about sculpting the skull: my first attempt at a skull turned out much better than any of my attempts to sculpt a face. (Hopefully that’s not just beginner’s luck.) When trying to sculpt faces, it all falls apart when I get to the lips. I cannot sculpt realistic lips. Cannot. The teeth on my skull aren’t perfect either, but they look more like teeth than any attempts at lips have looked like lips. What’s up with that? Also, because I watched the first few seasons of Bones, I’m wondering what Angela’s forensic facial reconstruction would make of my skull. Would it look human at all?
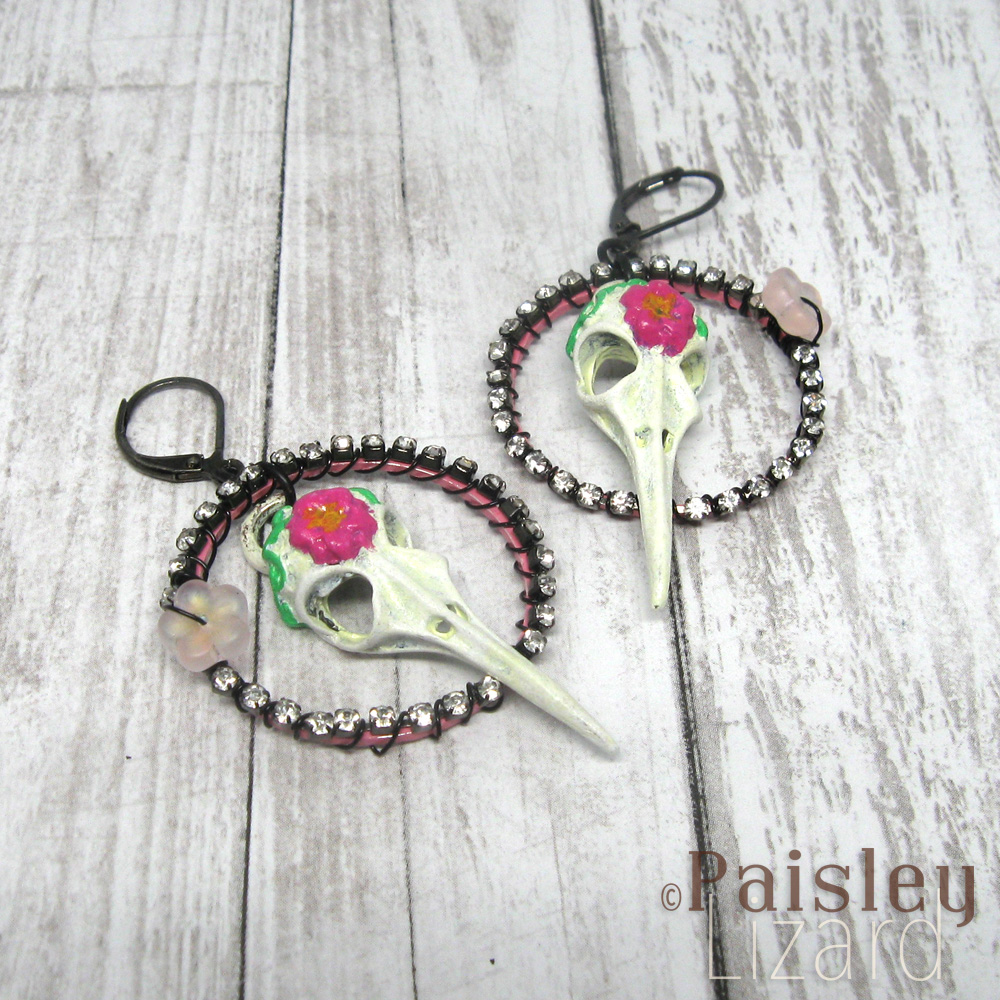
For the next project this month, I went on an expedition in my studio, an archeological dig of sorts. I have a bin filled with metal charms and pendants, mostly Blue Moon brand purchased from the “clearance” section of my local craft store bit by bit over the years. I knew there were some bird skulls in there somewhere, which I thought would work well for this theme. I had a few pendant sized bird skulls in antiqued brass finish, and a package of three smaller charms in antique silver finish.
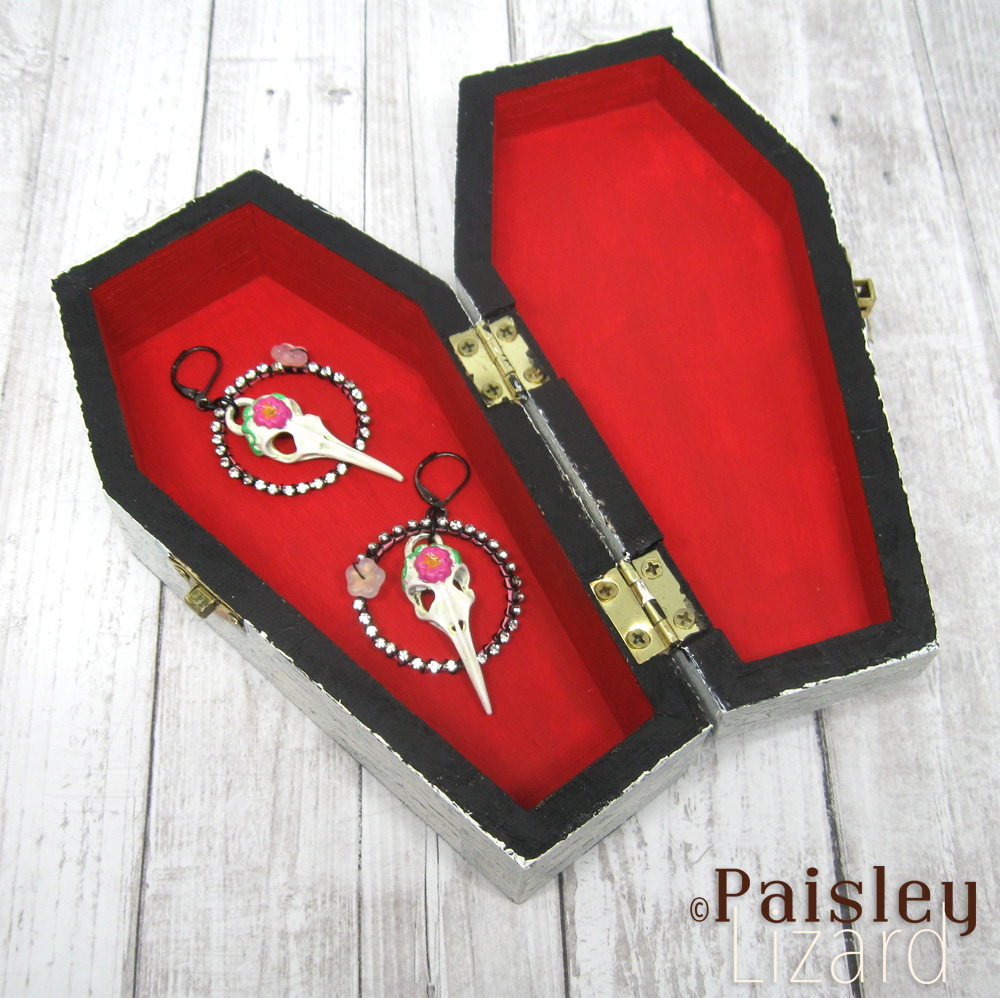
While digging around for the bird skulls that became earrings I also found a larger bird skull pendant focal with wings and an ornate whatchmacallit. Rather than make another piece of jewelry (my etsy shops overfloweth with jewelry these days), I unearthed a little wood coffin box with hinged lid. I have a tote full of little papier mache and wood boxes in assorted shapes and sizes that I accumulated in the “before times” when you didn’t need a hazmat suit to go out in public. My days of wandering around the craft store for an hour or more, filling my basket with random shiny objects for a “someday” project, have come to a pause with the pandemic. You’d think that means I’m saving money. But then you’d be forgetting mail-order, which isn’t as satisfying as a treasure hunt in person, but can be equally costly.
Anyway, I painted the skull and wings on the pendant using Vintaj inks, leaving most of the whatchmacallit antiqued silver, except for three red bead accents. Then I gave the coffin a distressed antique white crackle finish outside with a contrasting red and black inside. I don’t have any work-in-progress photos for this project. Just picture me impatiently waiting for each coat of paint to dry.
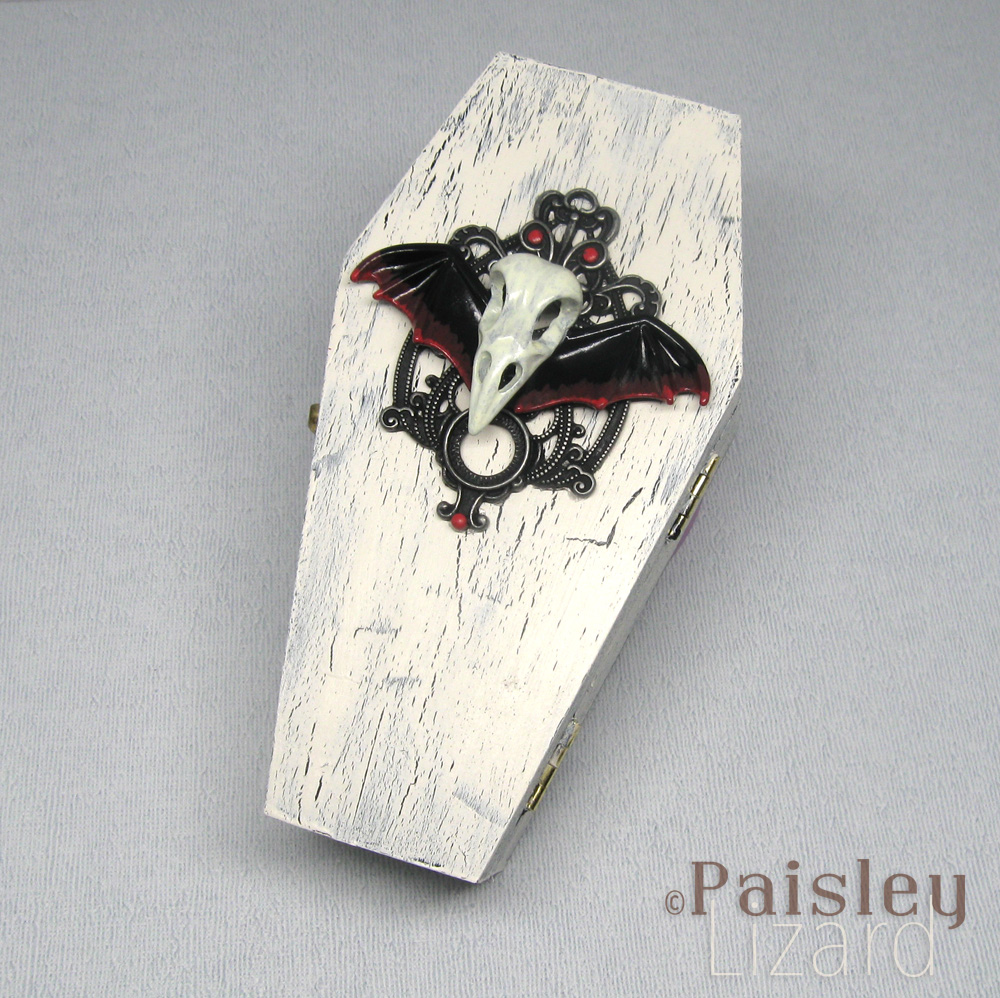
I feel as if the box is not done because I didn’t add bits and bobs to the sides. I wanted to, but couldn’t find anything I thought would go with the doodad on the lid. And sometimes less is more, right? Right?
As usual with these inspiring challenge themes, there were more ideas than there was time to get to them. One idea involved embroidery, a sleeping bat, and the moon. I may yet get around to that one once I figure out what stitches and colors of thread I need to use. As always, my thanks to the Art Elements team for these monthly challenges to keep me inspired and creative. And many thanks to you for stopping by my blog today. Please leave a comment if the spirit moves you. In case you don’t know, I also post photos of works-in-progress and final projects on my Instagram and Facebook pages, if you want to follow along. Fair warning, there are also occasional photos of my cats.
Tammy I always enjoy reading about your thought process and journey to complete a piece! These are very cool looking. I really like your skull jar!
Thanks so much, Donna. It’s nice to know I’m not just “talking to myself” on my blog. LOL
I love all that you made, but the skeleton jar and Gothic spider earrings are my favorite!
Thanks so much, Kathy.
So many great ideas and inspiring projects. As always, your claywork just amazes me!
Thanks so much, Hope.