
The theme for the July design challenge from the Art Elements team was “hollow.” Hollow can mean something that has a hole or empty space in it. It can also be the term for the space or depression itself. One suggestion for the challenge was to consider whether we wanted to represent the empty space itself, or to fill the hollow space with something. Of course, I wanted to try both variations on the theme and had several ideas. Spoiler alert, I only finished one idea.
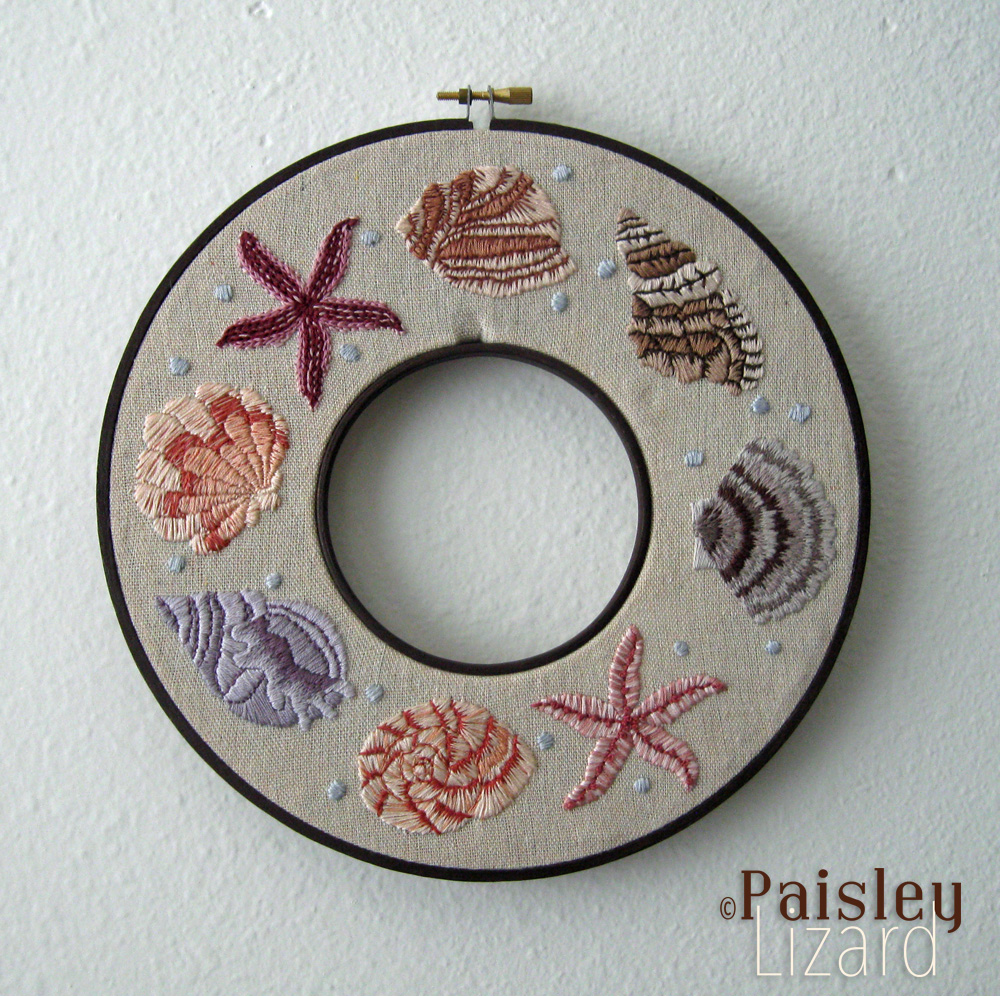
I’ve been admiring some double-hoop embroidered wreath projects seen on social media and, thanks to shared links from some AE team members, found instructions for how to hoop the fabric. I probably (maybe) could have figured it out on my own with some trial and error, but it was especially helpful to see tips for what fabrics work best and how to get the fabric taut between the two hoops. Once complete, the embroidered wreath would have a hollow center, thus fitting the design theme.
After contemplating ordering a double-hoop wreath kit, complete with thread, hoops, and printed fabric, as well as ideas ranging from autumn leaves to flowers and insects, I settled on seashells for my embroidered wreath. I’m not a seashell decor kinda gal, but they seemed like an appropriately summer motif. Also, sea shells are hollow. Or rather, they are a hollow structure built and used by the gastropods who live in them. Hollow doesn’t necessarily mean empty.
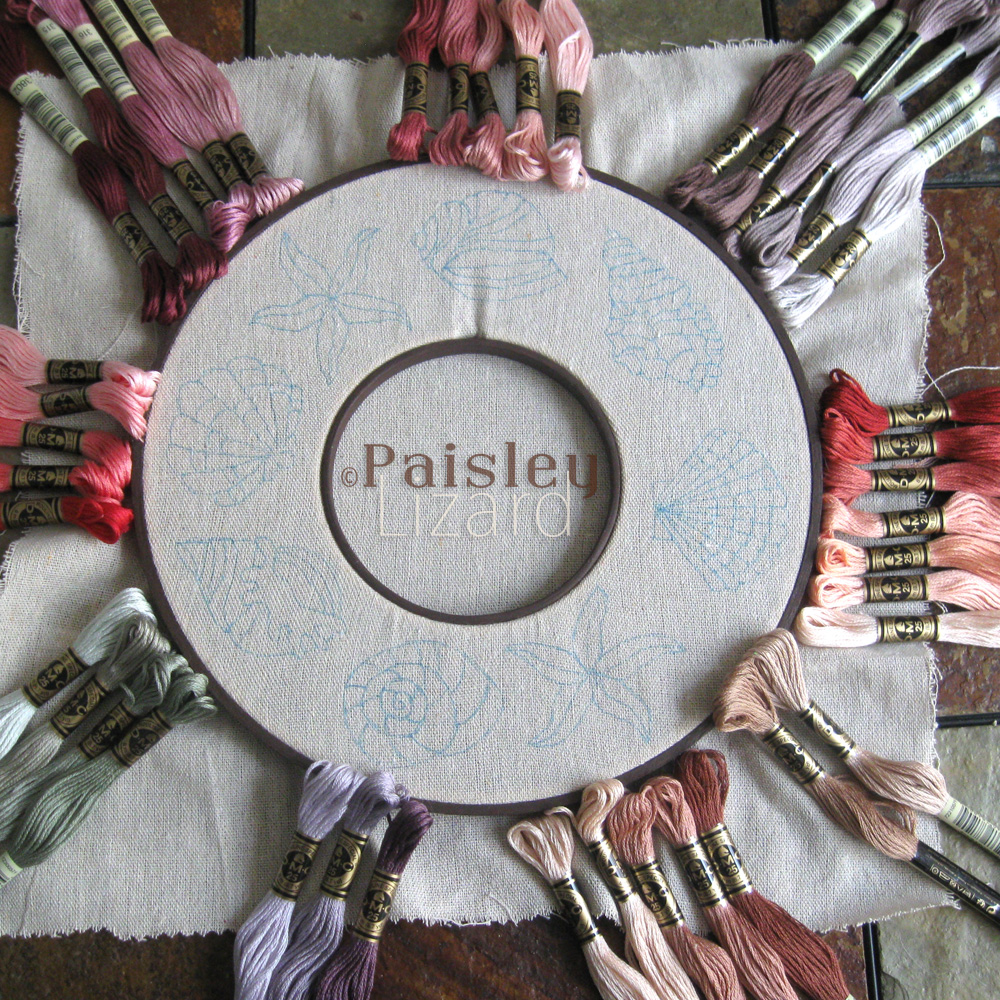
In pre-pandemic times I would have run up the road to my local Michaels for hoops and thread and such for this project. But even in better times, my local store had an unpredictable thread and hoop inventory and I’ve usually had to mail order at least some colors or sizes. So I opted to order everything, while being extremely grateful to the people who pack, ship, and deliver my supplies during these trying times. The hoops and some linen fabric arrived on the 8th. The thread arrived about a week later.
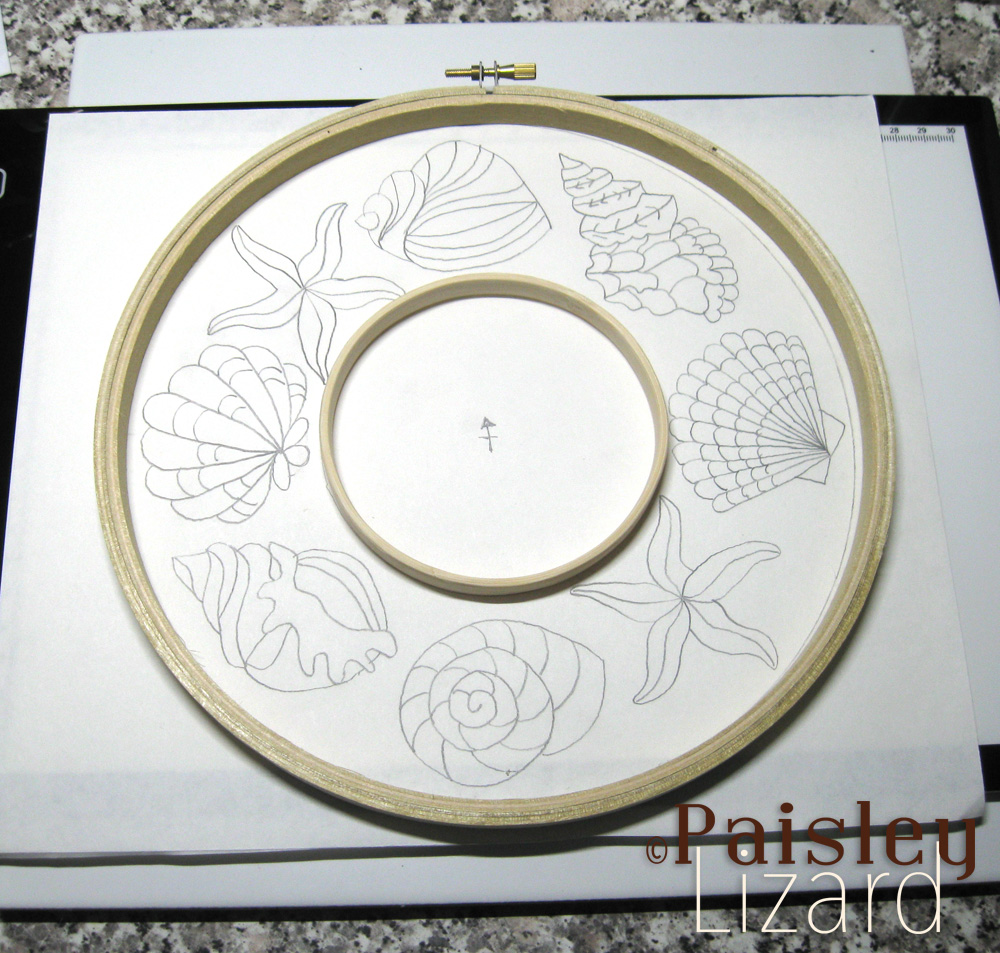
While waiting for the thread, I proceeded with getting the hoops, pattern, and fabric ready. To prep the hoops, I painted the parts that would be visible from the front using a blend of burnt umber acrylic paint and some gold acrylic ink for shimmer. The shimmer is subtle and just enough to keep the paint from looking flat. Normally, I would have painted the hoops after stitching the design. I don’t always know how I will finish a hoop until after I’ve stitched fabric. And I like to press the fabric before finishing a hoop. However, I read that it’s not a great idea to take the fabric out of the hoops when using the double-hoop method because it can be difficult to get them properly re-aligned. And after the struggle to get the fabric centered into the hoops in the first place there was no way I wanted to test that. So, I painted the hoops and left them to dry while I worked on the pattern.
For the pattern, I sketched the outlines of my hoops onto copy paper to use as guides for the design area. After drawing an assortment of shells, and a couple of starfish for variety, within the circles, I was ready to stretch the fabric and transfer the pattern with a heat erasable pen. Thanks to a video tutorial, getting the fabric hooped was much less trial and error than it could have been. Getting the design the right size, however, took a few extra steps because I initially failed to account for room needed around the edges of the hoops to stitch. Did you know the diameter inside the hoop is smaller than outside? I did, and I still didn’t think to leave room for that. Thank goodness for the reduce/copy feature on my all-in-one inkjet printer.
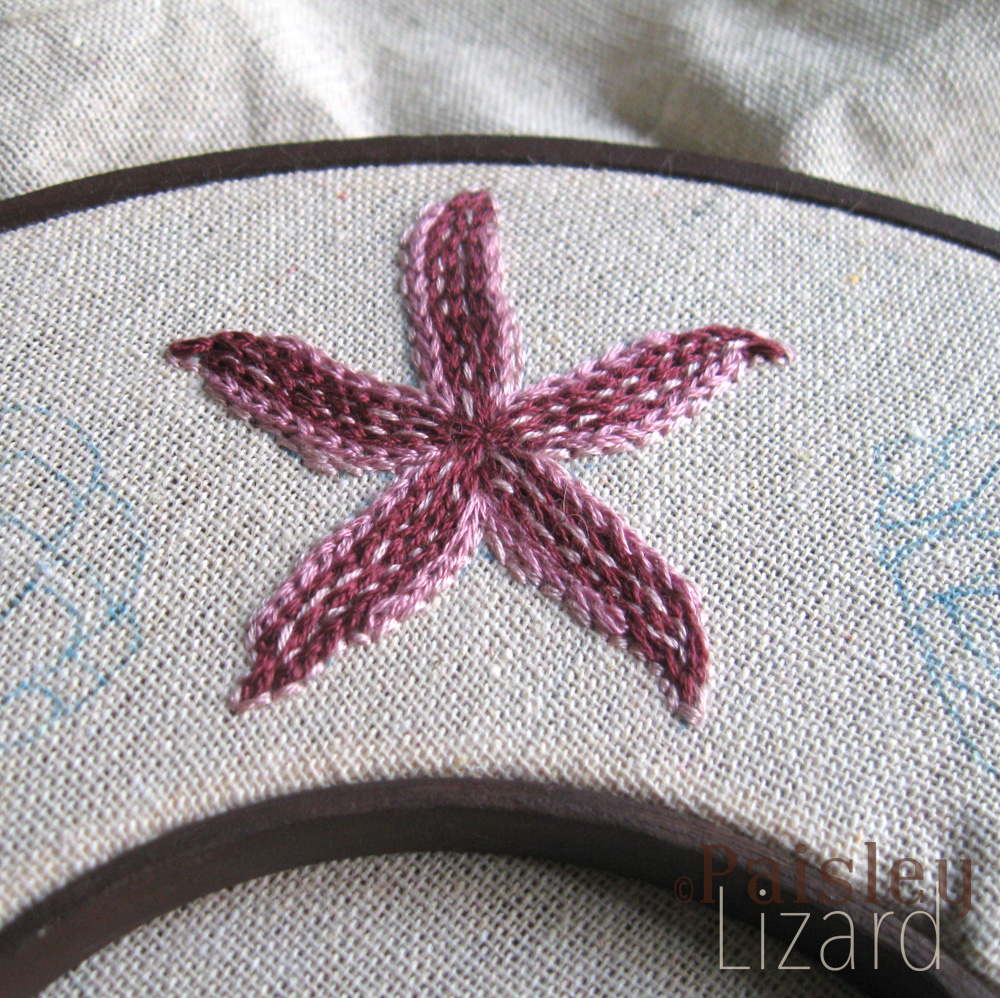
After waiting impatiently for the thread to arrive (I’ve come to realize how spoiled I was by next-day delivery pre-pandemic), I was finally ready to begin stitching. I wanted lots of texture in the seashells so I reviewed my stitch guidebooks for types of nubby or bumpy stitches I might use. I started with one of the starfish, using rows of chain stitch accented with backstitch. I liked the texture, but not my choice of colors. For the other starfish, I used satin stitch for a feathery look to the arms, and added french knots for more texture. And then, somehow, I ended up using satin stitch and backstitch for the rest of the shells.
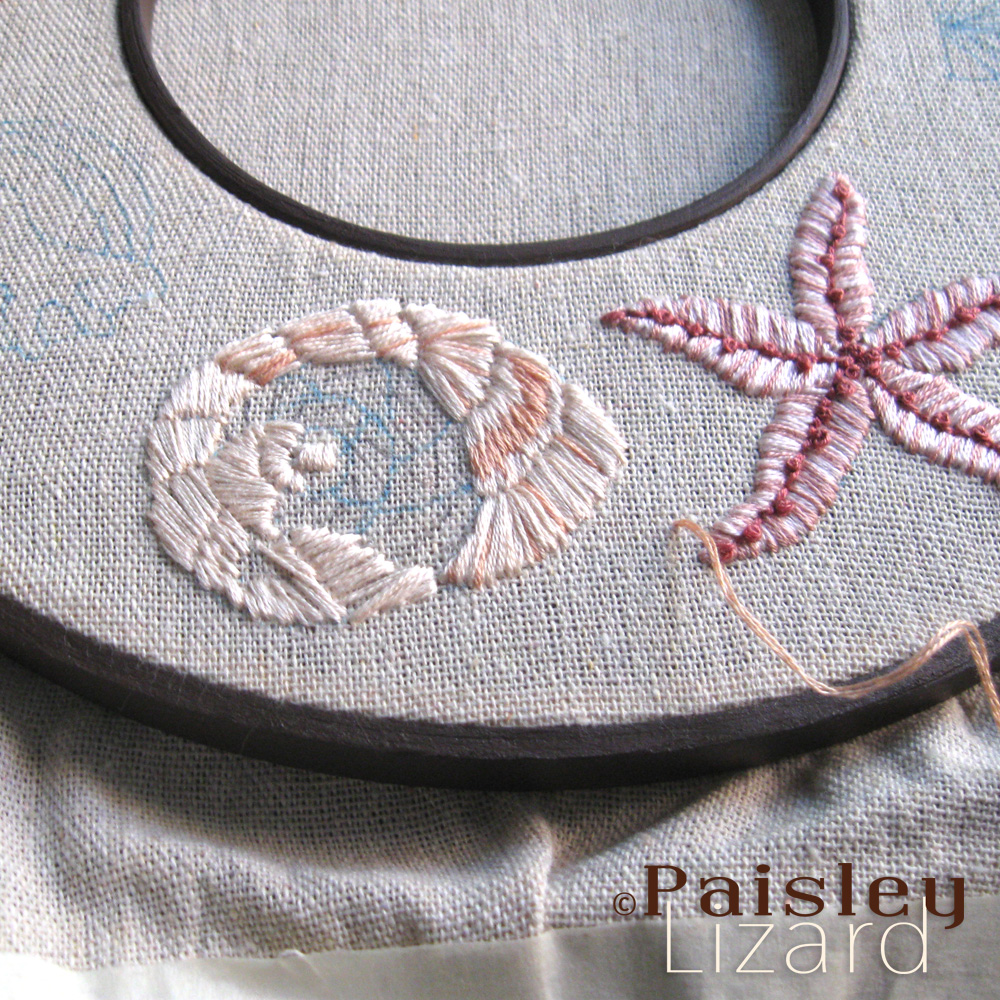

After stitching all the seashells and starfish, and being satisfied with how fewer than half of them turned out, I felt like the design needed a little something more (besides better stitch choices). I contemplated filling in some spaces around and between the shells with coral or seaweed doodles. But by this time there were only a few days left in the month and I was, frankly, over this project. So I stitched a few dozen “bubbles” scattered around and called it good enough.
I was nervous about cutting the fabric in the center. There’s really no going back once that’s done. But I started this project intending to try a double-hoop wreath, so there was no good reason not to keep going. I think I held my breath as I stabbed into the center to start the cut. There was a worry the loosely woven fabric would tear or fray out of control It worked out in the end and, with the help of a little all-purpose glue and some clamps, the wreath was completed. I’d like to put some felt on the back to cover the stitches and cut fabric edges. I’m pondering the mechanics of that while I wait for an order of acrylic felt squares to arrive.
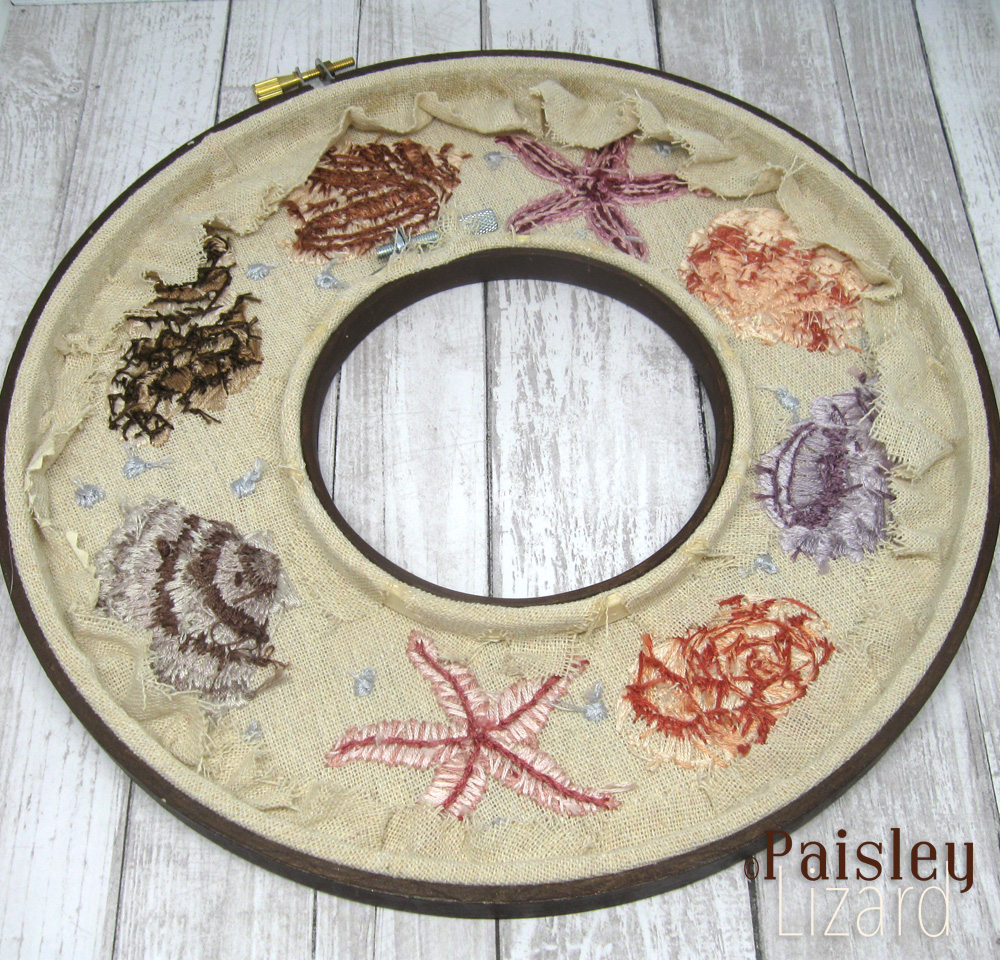
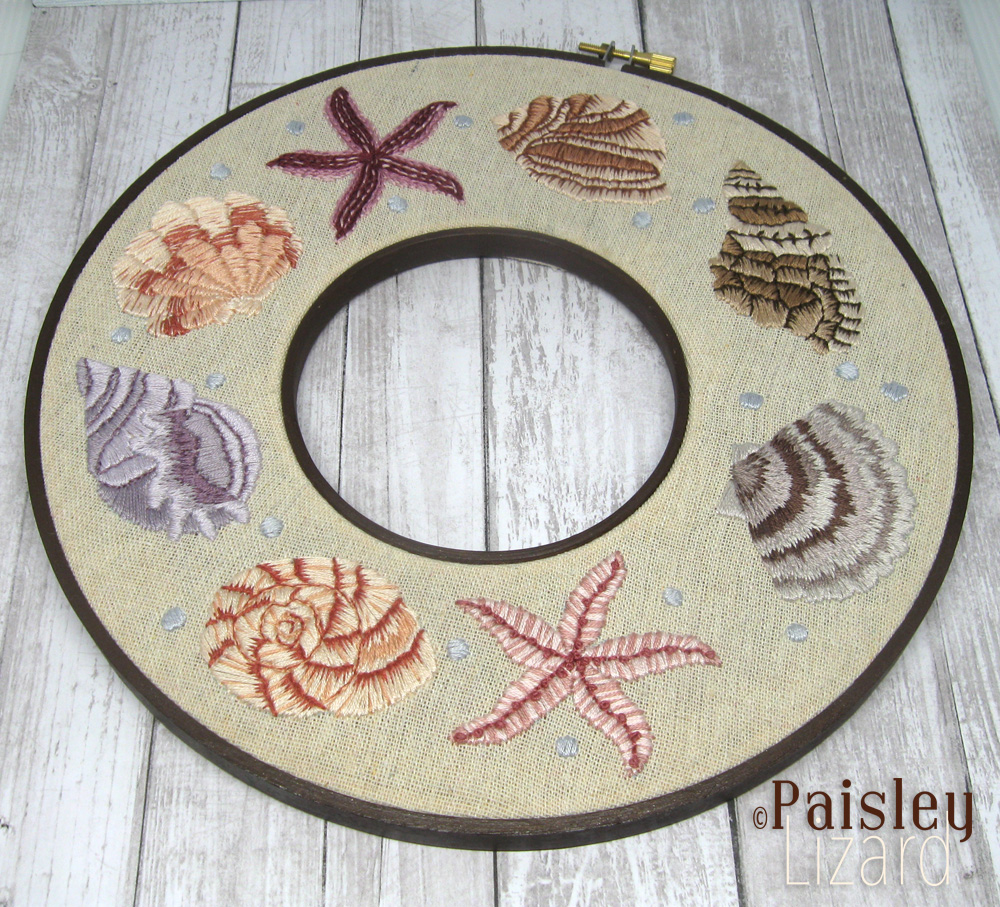
Among the lessons learned from this project are that the hoop in the center really really needs to close tightly. I used a 9-inch hoop for the outer ring and a 4-inch for the inner. All of the 4-inch hoops I received in my order were too small in that I couldn’t get the edges screwed closely together. As a result, there’s a pucker in the fabric over the half-inch gap under the screw. Just one more thing about this wreath that’s not perfect.
This was a fun learning experience and I would definitely try the double-hoop style again. I already have a list of design ideas. Maybe one of them will coincide with another design challenge. There was no polymer clay involved in this month’s designing. It’s been above 90F for most of the month, or close enough with humidity as to make no difference. And turning on the oven to cure clay under those conditions was not going to happen.
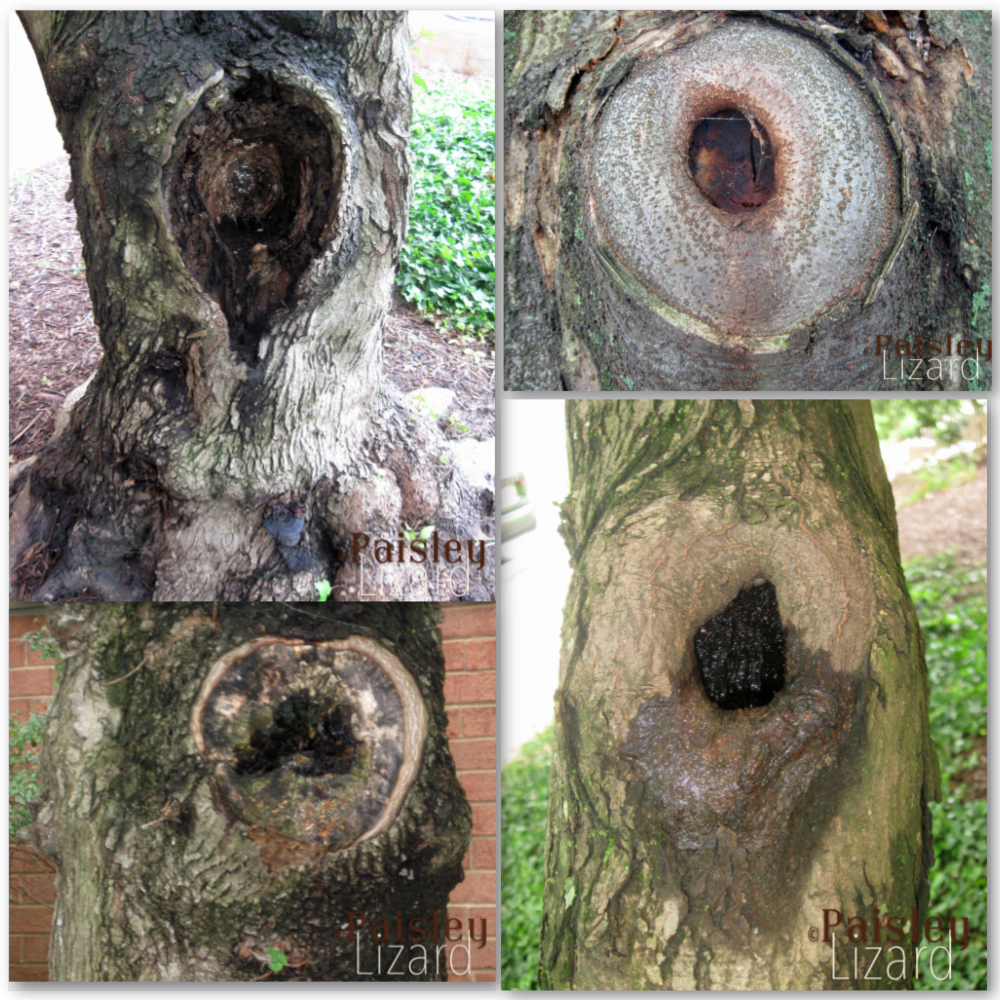
There is one more contribution to the theme, though I wouldn’t consider it an art project. I took my camera on a short walk around my apartment complex looking for hollows to photograph. As previously mentioned, it’s dang hot out there so it was a very short walk. Even so, I found four trees with interesting hollows formed either when limbs were removed or from some other trauma. I wouldn’t consider my photos art because I didn’t alter them in any way other than to crop the images. But the hollows themselves are awesome examples of natural art formations.
Many thanks to the AE design team for another inspiring theme and the excuse to try double-hoop embroidery. And thanks so much to you for stopping by my blog today. Please leave a comment if the spirit moves you. And remember, you can follow me on Instagram for works-in-progress and updates on my creative journey.

I am feeling inspired now to go see what’s lurking in my drawer of needlepoint supplies.
Isn’t it great to find reasons to explore a stash of art and craft supplies?
I absolutely love your finished product. I am enthralled by the double hoops and the open design. I love the sea shells and how they look in your embroidery. Well done!
Thanks so much, Kathy. Whoever invented the double-hoop method is brilliant. I definitely would not have thought of it and am glad someone did. 🙂
How ingenious, the double hoop!! Your stitching is beautiful and the colors chosen also. Now I wanna go to the seashore :).
Thanks so much, Alysen. The double-hoop is ingenious and I wonder who first thought of it.
Beautifully done and kudos to you for your patience. The design is lovely! I love seashells for their beauty and think you have captured them very well.
Thank you as always for explaining the process in detail, always an interesting read!
Thanks so much, Cat. I like to explain the process a bit because this blog is about my creative journey, the trial and error, the learning experience, and the accomplishments. 🙂