The theme for the February Art Elements design challenge was “letters.” As our hostess for this theme noted, that word could be interpreted either as the symbols of an alphabet or as written communications, like the kind sent by snail mail. For my interpretations, I used alphabet symbols to stamp words in polymer clay and I embroidered letters onto fabric. I also used letters to make the words in this blog post. Because I’m clever like that.
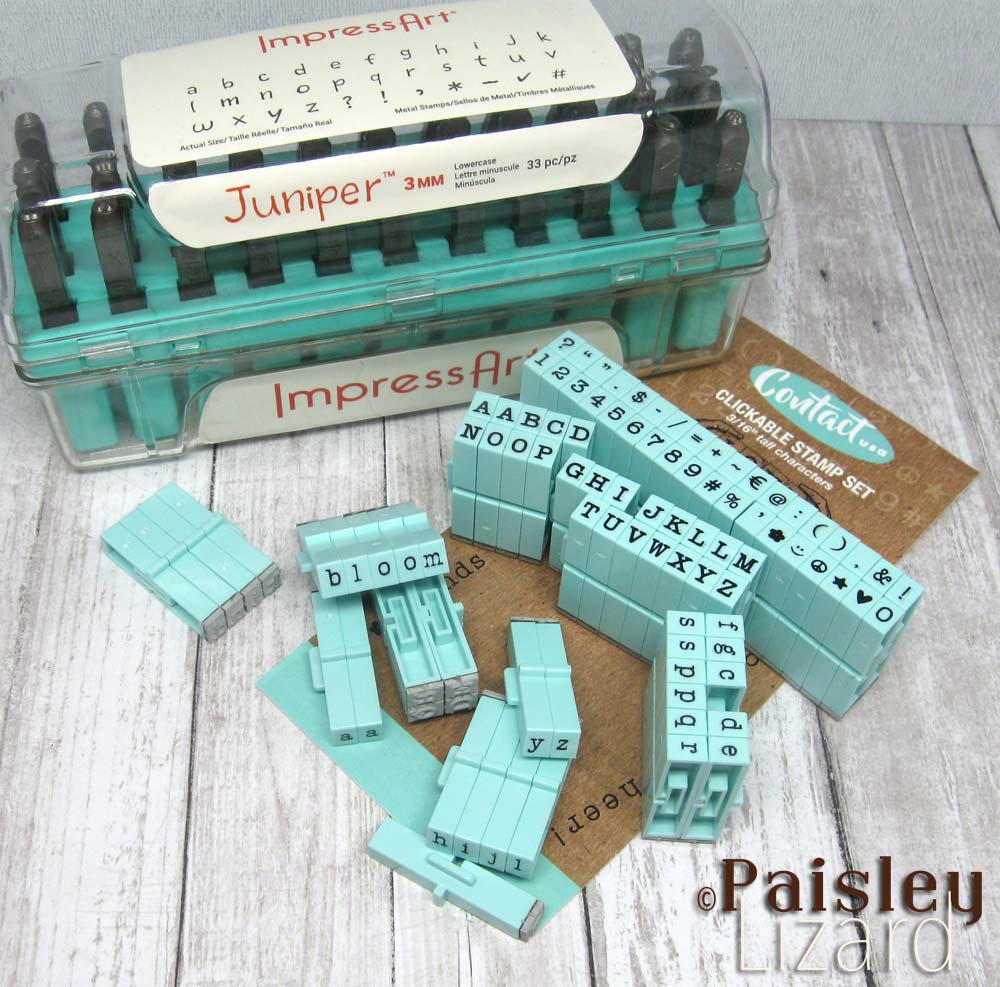
By complete coincidence, I bought some letter and word stamps just a few days before this month’s theme was announced. I have a long list of words I wanted to stamp into polymer clay beads. As it happens, the letter stamps are a tad too large for many of the words I had in mind. Or rather, many of the words would not fit on the size beads I wanted to make if I used my new letter stamps. You see, the letter stamps I bought click together, which comes in handy for keeping them lined up evenly. However, the spaces between the letters are wider than I would prefer. The trade off for my beads was between shorter words with letters perfectly aligned when clicked together and longer words with wonky alignment as I placed each letter individually. I chose a shorter word.
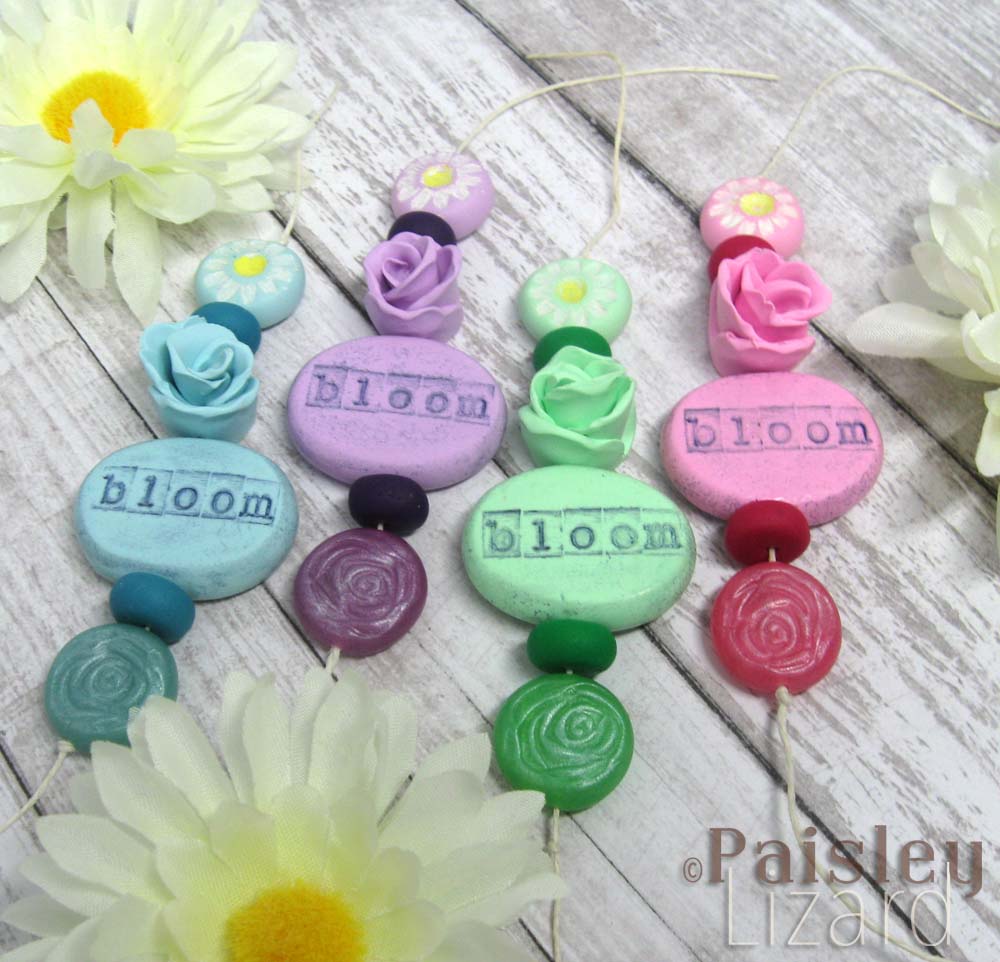
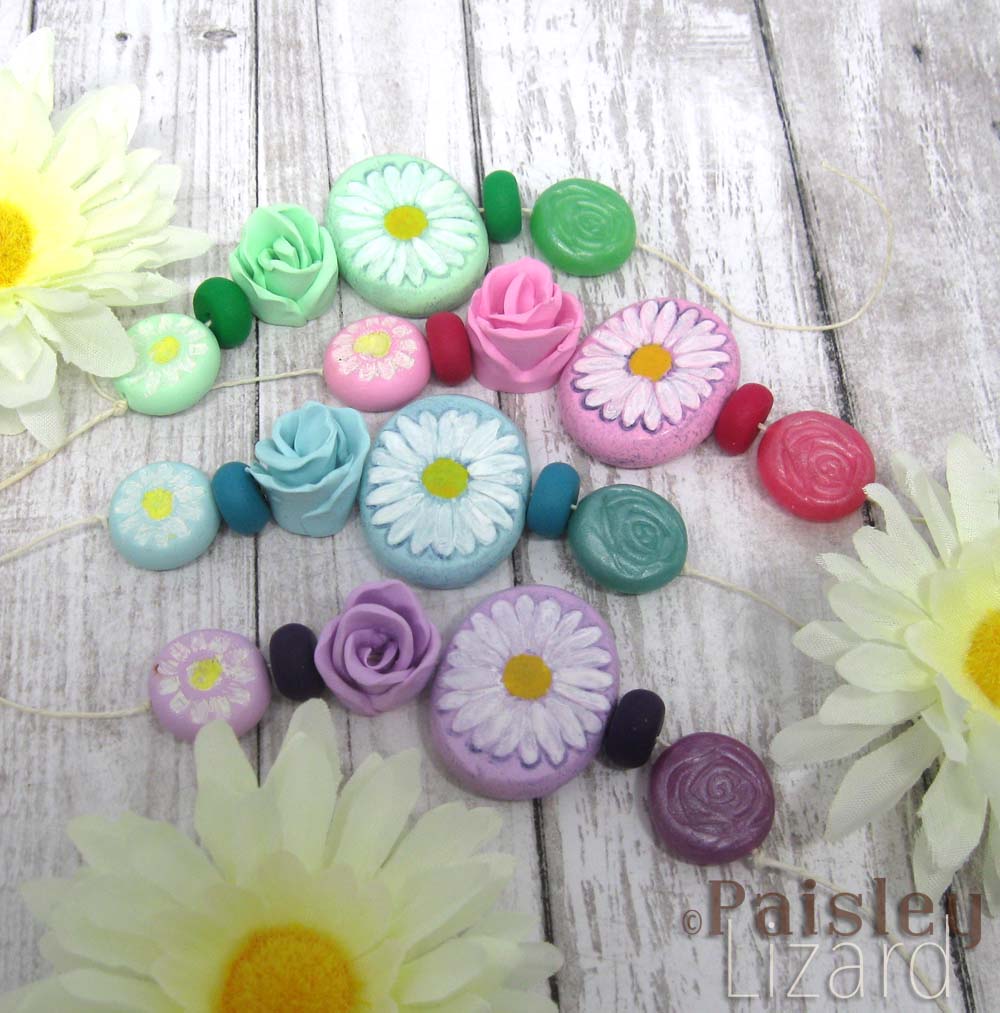
The short word from my list that I chose to stamp with my click-together letters was “bloom.” It’s been a tragically mild winter here (tragic for those of us who appreciate a good snow and what a hard freeze can do to overwintering populations of mosquitoes, fleas, etc.) and spring has been in the air (and in my eyes and nose, in the form of tree pollen) since the beginning of the month. So I took some Zyrtec, put antihistamine drops in my eyes, and mixed up some spring pastel colors of polymer clay for beads.
The stamped “bloom” beads have an origin story. One of my favorite sayings is “bloom where you are planted.” I don’t know its origin, but I like the sentiment. Be your best self, live your best life, no matter what circumstances you find yourself in. The backs of the bloom beads are stamped with a daisy, which I painted white after the clay was cured. The daisy is the sacred flower of Freya, the Norse goddess of love. So, you know, be yourself, love yourself, and bloom.
During the several days when I was working on the bloom bead sets, I also made a few pendant/connector beads using one of the phrase stamps I bought. I think the stamps are intended for scrapbooking, but they work fine with polymer clay. The phrase I worked with is “Never apologize for who you are.” It’s in keeping with the same “be yourself, love yourself” theme as the bloom beads so I used some of the same spring pastel clay colors.
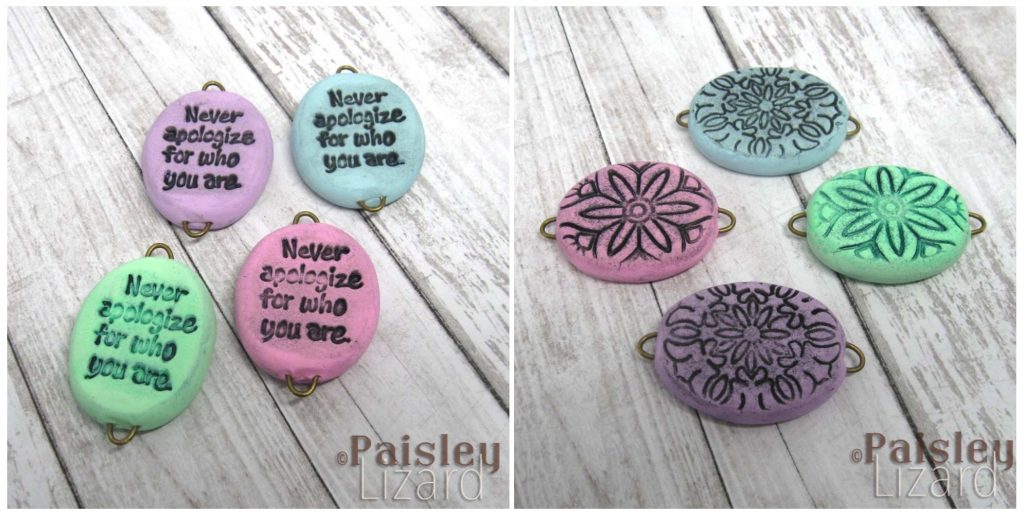
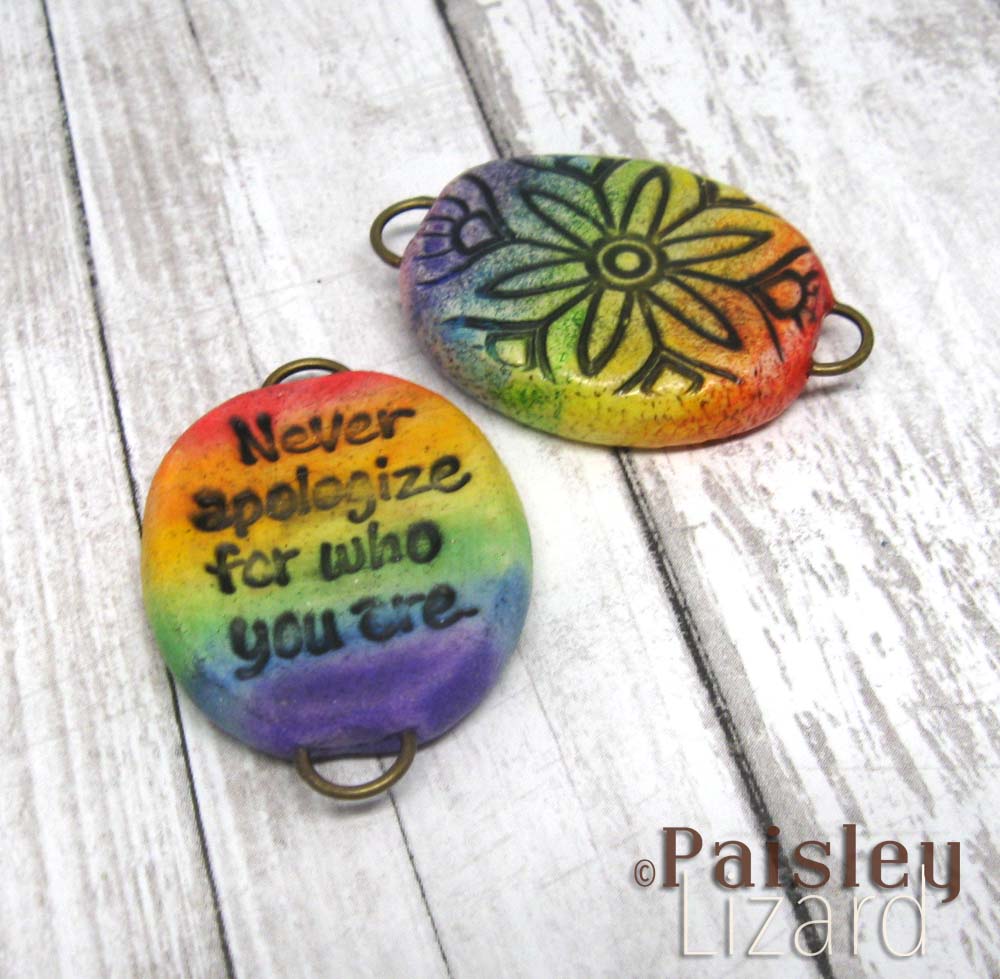
After stamping, curing, and antiquing a batch of pastel pendants, I decided I needed some rainbow versions. I only made two rainbow beads to test the coloring method. One was colored with pan pastels before curing and one was colored with Inktense blocks after curing. I like both versions and might make more.
There would have been other word or phrase beads for this reveal were it not for all the unscheduled couch-potatoing that went on during two weekends in mid-month. I wasn’t ill or anything. I just felt like spending quality time on the couch with some books instead of standing up at the kitchen counter squishing clay. This is a luxury of making things as a hobby as opposed to for a living: I don’t have to make things if I don’t feel like it.
While I was reading books, with words, made from letters …ideas for this challenge were percolating in the back of my mind. The ones that bubbled up first had to do with embroidery stitch samplers. I didn’t want to embroider a traditional alphabet sampler – who has room for one of those on their wall anyway? – so I chose some short cheeky phrases. For embroidery with attitude.
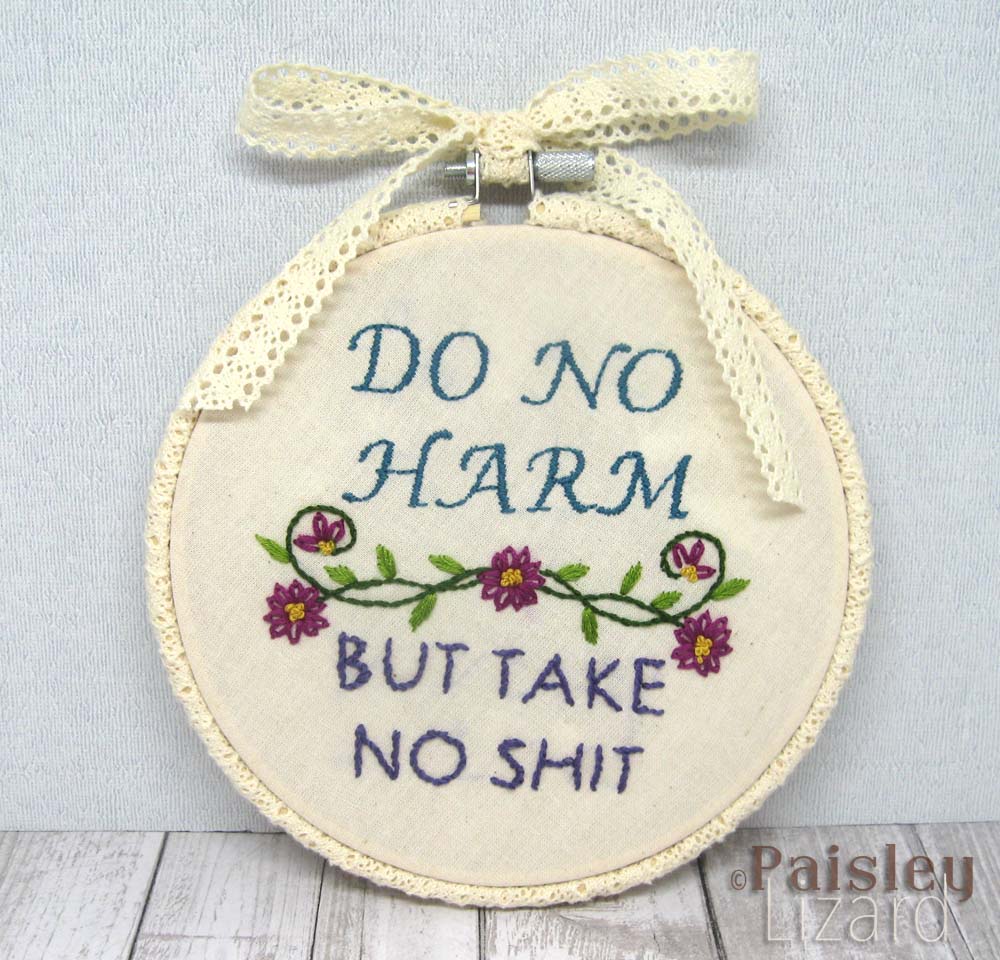
When I was in high school some time during the last century I had calligraphy pens and used them to write letters. I was pretty good at it and even got paid by a neighbor to address invitations. I don’t know what happened to those pens, or my handwriting skills. What I do know is that I’m grateful to PicMonkey for having a large font library, which I used to design my stitch samplers.
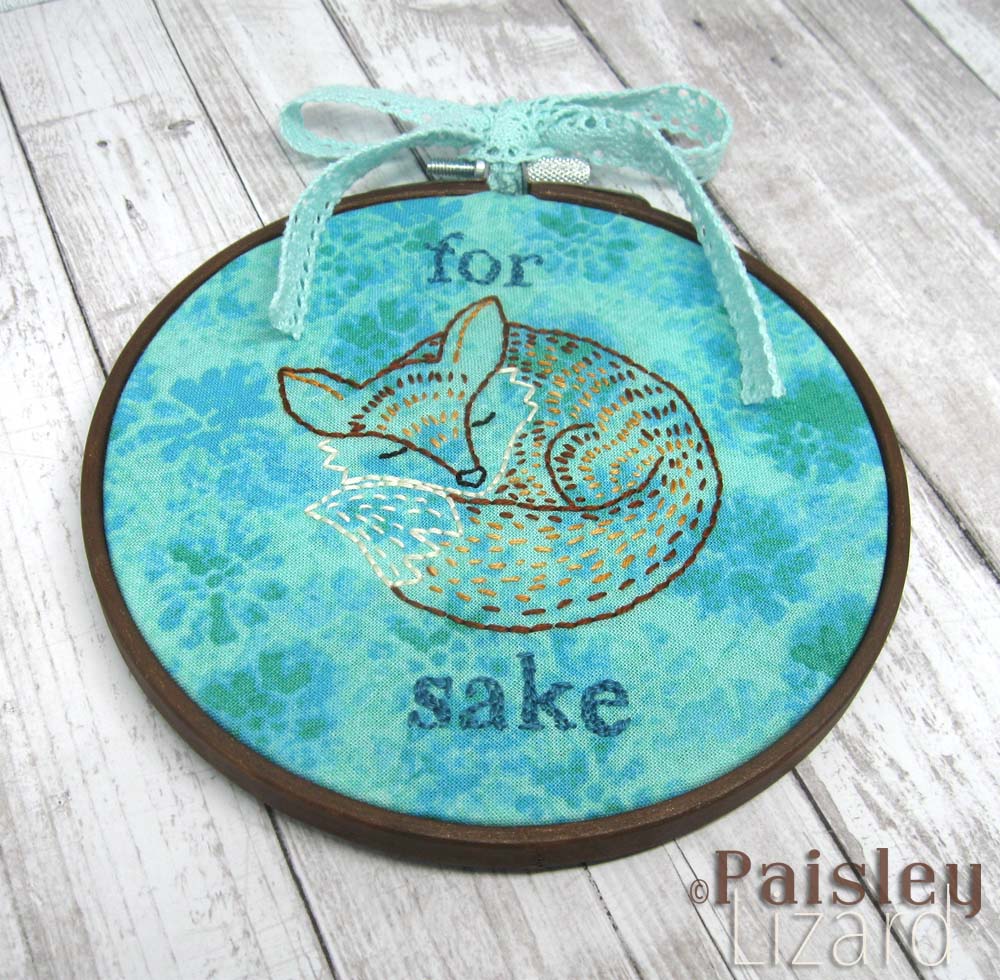
Because my lettering skills ain’t what they used to be, I used PicMonkey to plan each of my embroidery designs. On a blank canvas, I drew a circle the diameter of the hoop I wanted to use. Inside the circle, I added and manipulated text or graphics. Once I had the words lined up where I wanted, I printed the design and transferred it to my fabric with a heat-erasable pen.
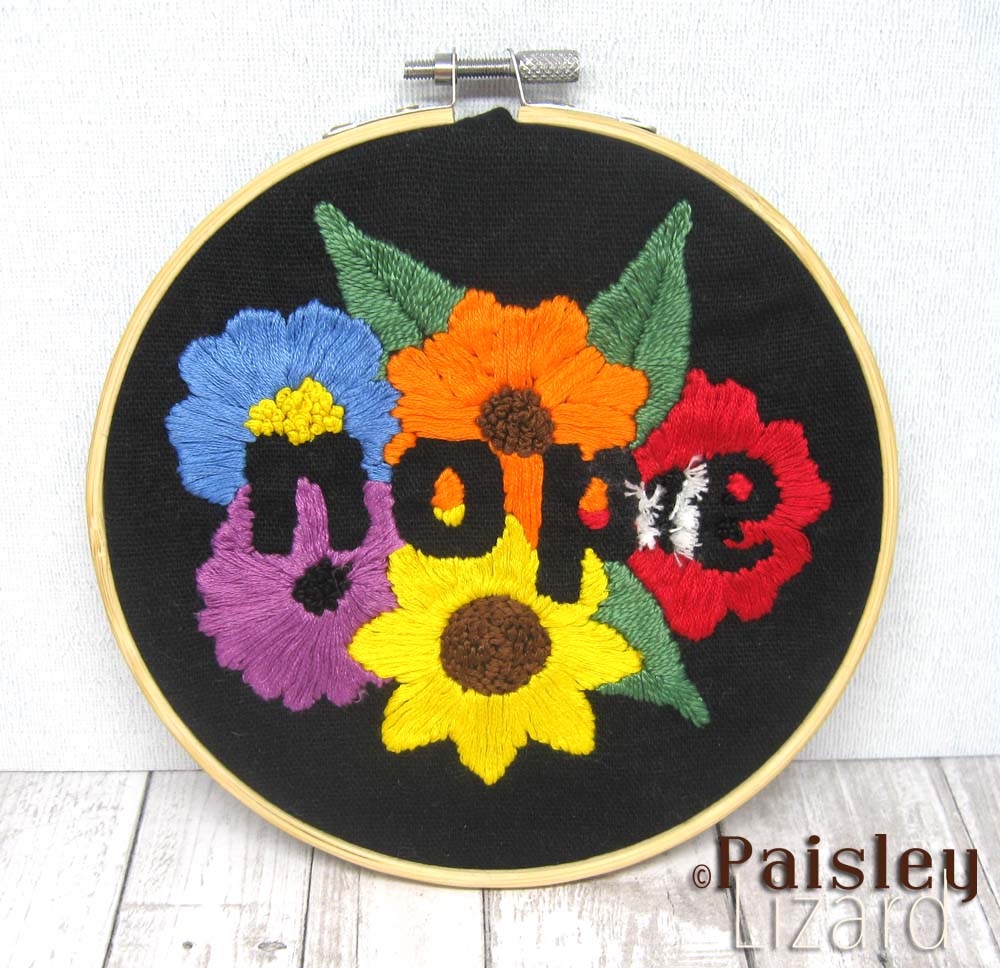
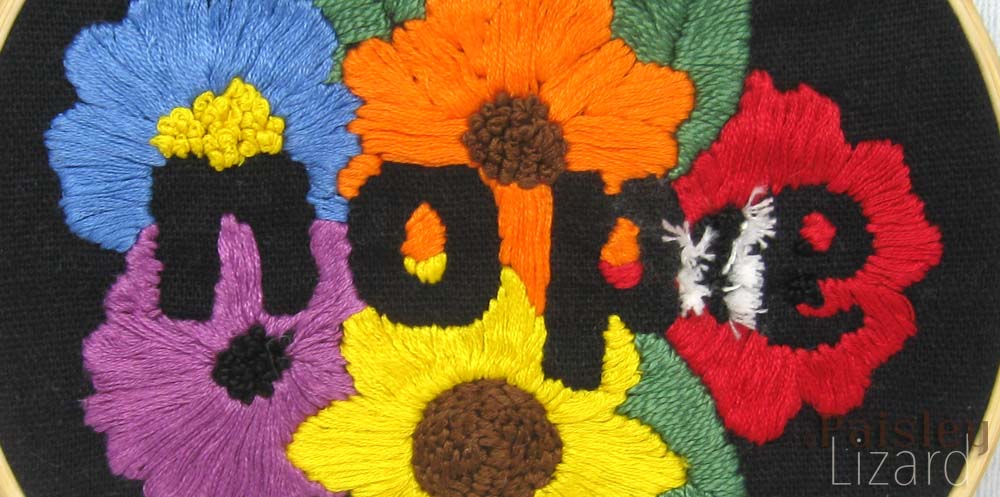
The “nope” embroidery design makes use of negative space among flower petals to form the letters of the word “nope.” I’ve seen examples of this type of embroidery in my Instagram feed so I take no credit for the concept. But the design itself is all me. Well, me and PicMonkey’s fonts and flower clip art. I’m not quite done with this hoop. I don’t love the white Turkey work I added as a last minute detail. I added the white tufts because I used black floss for the center of the red flower, forgetting that the fabric under the white fabric stabilizer was also black. When it washed off, my “p” and “e” were hard to spot and I was hoping the white tufts would work. Probably should have taken the black out and made the center white. Still might. I also haven’t decided how to finish the hoop. I’m thinking a black wood stain, or maybe a black and white gingham ribbon wrap. I’ll share on my Instagram page when I add all the finishing touches.
That’s it for my interpretation of the letters theme. Thanks for stopping by my blog today. If you’d like to see more letter-inspired art in a variety of media, please visit the links for the other participating artists. Your chores can wait.
Guests: Tammy (<–You are here.) Karin Kathy Evie & Beth Divya Hope Anita
Tammy the pieces you made are amazing, your embroidery pieces are really beautiful but those polymer beads are just stunning, I love the colours and how they work so beautifully as a set with the faux pressed glass coin flowers and the painted daisies they really are wow!
Thanks so much, Niky. I was trying to come up with a set of beads that would work in a bracelet or necklace, or could be broken up and used individually.
Your embroidery is awesome. The polymer clay beads are amazing. You did such a wonderful job. My favorites are the floral set.
Thanks so much, Kathy. 🙂
Always love your posts! Your work is very impressive, inspirational and gorgeou! You are a very talented lady!
Thank you so much, Maria. 🙂
As usual, you’ve gone above and beyond with the theme! Your polymer clay beads are great (I’m espeicially loving the little roses and the rainbow beads!) But, it’s your embroidery work that really captures my attention. They’re all so cheeky and cute. I’m so glad you’re getting the hang of designing your own because you have a real knack for it. Of the embroidered designs you have for today’s reveal, I can’t and won’t pick a favorite – they’re all too amazing.
Thanks so much, Hope. I am having fun with the embroidery. I really should do more kits or patterns to really get the hang of the basics, but I’m too impatient.
You really got a lot accomplished! Those bloom bead sets are great and they remind me of an old chair that I painted with that phrase years ago and used it on my deck as a plant stand. I had forgotten about that chair until I saw these beads. I wish I knew what happened to it as it no longer resides with me:-( The rainbow connectors are truly awesome! and all I love all your embroidery but ‘for fox sake’ is my favorite!! That one is perfect.
Thanks so much, Cathy. Using a chair as a plant stand is something I would love to do. Someday, when I have a porch.
Thanks for all the cool inspiration! Because I’m an idiot, it never occurred to me to paint hoops….can you believe it?? Now I may have to go back to embroidery/crosstitch and do some stuff…..oh, btw, I’d do the last hoop in red to match the flower…I love them! Going to your Etsy to see if those rainbow beads are still there maybe…
Thanks so much, Lori. It seemed natural to paint the hoops because they are “unifinished” wood and I love to paint things. LOL I don’t have the rainbow beads listed yet. I will try to get them up by the end of the weekend.
You have treated us to a plethora of pretties! I love the rainbow connector – many layers of meaning there. Polymer and text go hand n hand! I think your embroidery stuff is looking so great! And that couch potato time was pretty dang productive! THank you for joining us!
Thanks so much, Jenny. I think couch potato time let my muse settle into ideas easier than if I had kept trying to work on things. Sometimes my brain needs that kind of break.
I love the embroidery work – it is amazing. I really love the fox one 🙂
The polymer clay beads are amazing. I love that your stamps can clip together to make stamping easier. I just make mom grid out the letters for me.
I love the rainbow beads – the colors are gorgeous!
Thanks so much, Beth. I’ve seen the grid thing for stamping metal. I was trying to figure a way to do it on clay without leaving marks in the clay. But then since I stamped so deeply I left edge marks, it probably wouldn’t have looked any worse.
Your beads are creative and fun as always! Thank you for talking about your alphabet stamps – I had a similar size problem with some alphabet stamps that I bought years ago, and I’d forgotten all about them, but now some plans have started forming in my mind. These blog hops have never failed to result in more creative ideas! 🙂
And I just love your embroidery. Especially the one with the negative space – that’s a clever design.
Thanks so much, Anita. The evenly spaced letters probably look great when using the stamps for printing, but it is annoying when you have smaller areas to work with. Still, stamps are faster then etching the letters with a needle tool.
“I also used letters to make the words in this blog post.” Now why did’t I think of that! The number of creations you have on this page doesn’t reflect a hobby but a business. I can’t believe that you ever took a day off or couched as you pointed out. Of all your creations here, I really like the hoop embroideries. But for some reason (maybe because its dinner time here) I read NOPE as ” No Pie” with the white tufts becoming the “I” and wondered for a few seconds why anybody wanted to embroidery No pie. LOL!!
Thanks so much, Divya. Now that you mention it, I can see “no pie” in there as well. LOL. I need to rip out some thread and re-work that part of the design. Sigh. As for a hobby vs a business, I would be a failed business in that I never turn a profit. With my jewelry, I usually make enough to break even on supplies so it’s self-supporting hobby at least. 😀
Lovely work Tammy and full of signs of spring.
I am in favor of couch potatoing to read every day of the week! But for someone who didn’t do much, it sure looks like you did a LOT. I love all of it. Your embroidery is amazing. I also considered embroidering a cheeky saying to hang in the bathroom, but I never got there. I’ve also seen those designs that use blank space as a major design element and I just love them. Thanks for participating in another challenge. It’s always fun to see what you come up with