
This month the theme for the Art Elements design challenge is repurposing. Some of the materials and techniques I used for this challenge were reminiscent of my childhood art projects. I don’t remember those projects being as frustrating or messy as the ones I tackled this month. Maybe because there were always adults around to help and to clean up? Technically there was an adult around to clean up this time too. But she’d rather make art than have a clean and tidy home.
Many of the art and craft projects I can remember making as a child involved repurposing or upcycling, but I don’t know if those terms had been coined in the 70s. I made belts by crocheting pop top tabs together with yarn. Bracelets and necklaces were made by weaving together the paper wrappers from sticks of gum. Newspapers were turned into all manner of papier mache projects. I think there was an egg carton caterpillar? A piggy bank from a plastic bleach bottle. Those were just a few of the creative ways I found as a child to give new life to things that were otherwise destined for the trash. ‘Do you still have them or did they all end up the trash eventually?’ you may ask. I never threw anything away. What my mom did with them is a whole other story.
I don’t know whether it’s from all those repurposing craft projects during my formative years or a natural hoarder instinct, but I tend to save random bits and bobs for arts and crafts. I am especially fond of saving glass jars and bottles. Sometimes they are simply reused for storing food (I dislike plastic food storage containers) or repurposed to store loose change (where’s a bleach bottle piggy bank when you need one?), buttons, etc. Other times, they become works of art (at least in the eyes of this beholder) when I cover them with polymer clay and transform them into tidepools, seedpods, and cacti. I also save cardboard packaging materials and inserts in shapes I find interesting. I emphatically do not save TP rolls. I’ll pass on the bacteria-laden crafts, thanks.

Among the many odd things I’ve saved over the years are the metal tags that prove my fur kids received a rabies vaccine as required by law. I have no idea why I saved them, but this challenge is a perfect opportunity to use some to make a windchime-y suncatcher-y wall art thingamado. And also, I knew there was a reason I saved a handful of wire clothes hangers through several moves despite never using them for my clothes. They’re a little challenging to cut and reshape but, in the spirit of repurposing, I was determined not to buy anything new – like copper tubing or an embroidery hoop – for this challenge.
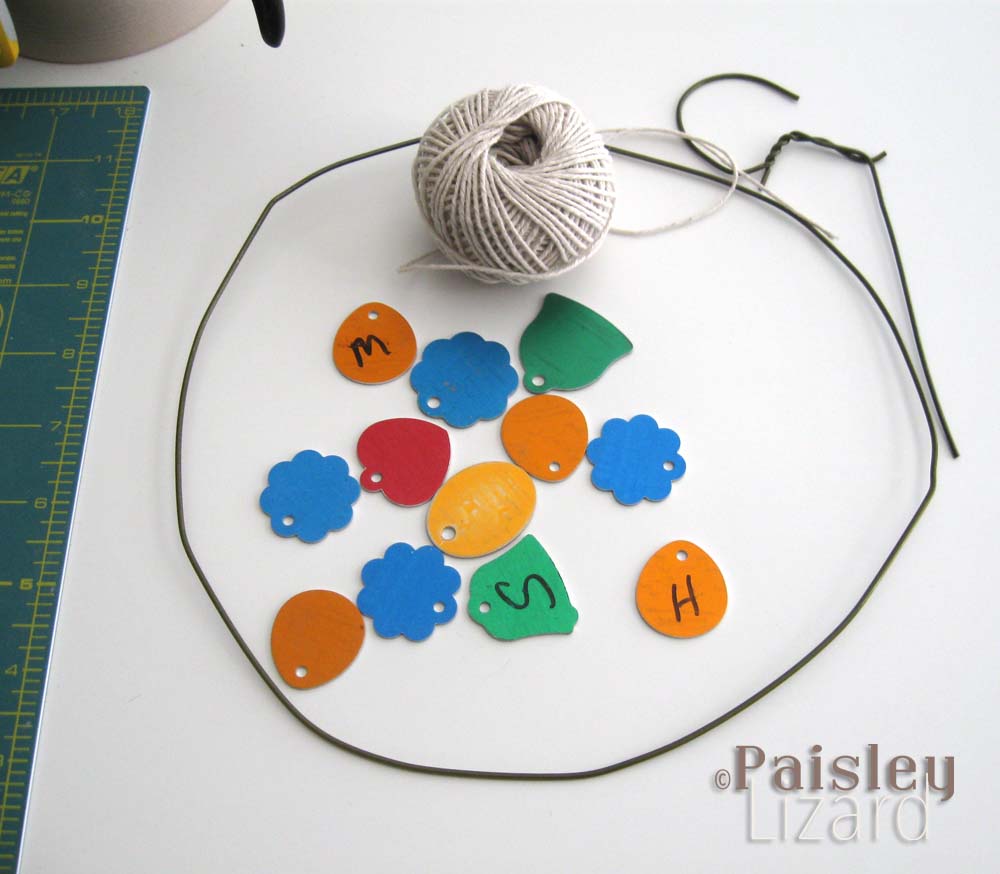
A portion of a coat hanger was formed into a rough circle and wrapped with jute rope. I used a thinner hemp twine to weave inside the frame. I took that inside design apart and re-did it three times and am still not happy with it. Some beads were added on the final attempt and I don’t think I like them as much as I thought I would. Although maybe they are starting to grow on me. I used more hemp twine to tie strands of beads with the tags at the end to the bottom third of the circle.

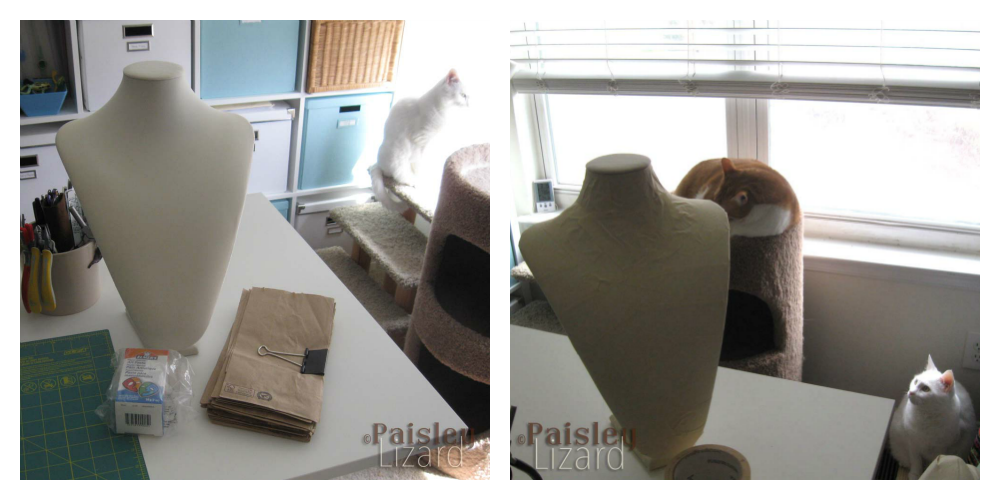
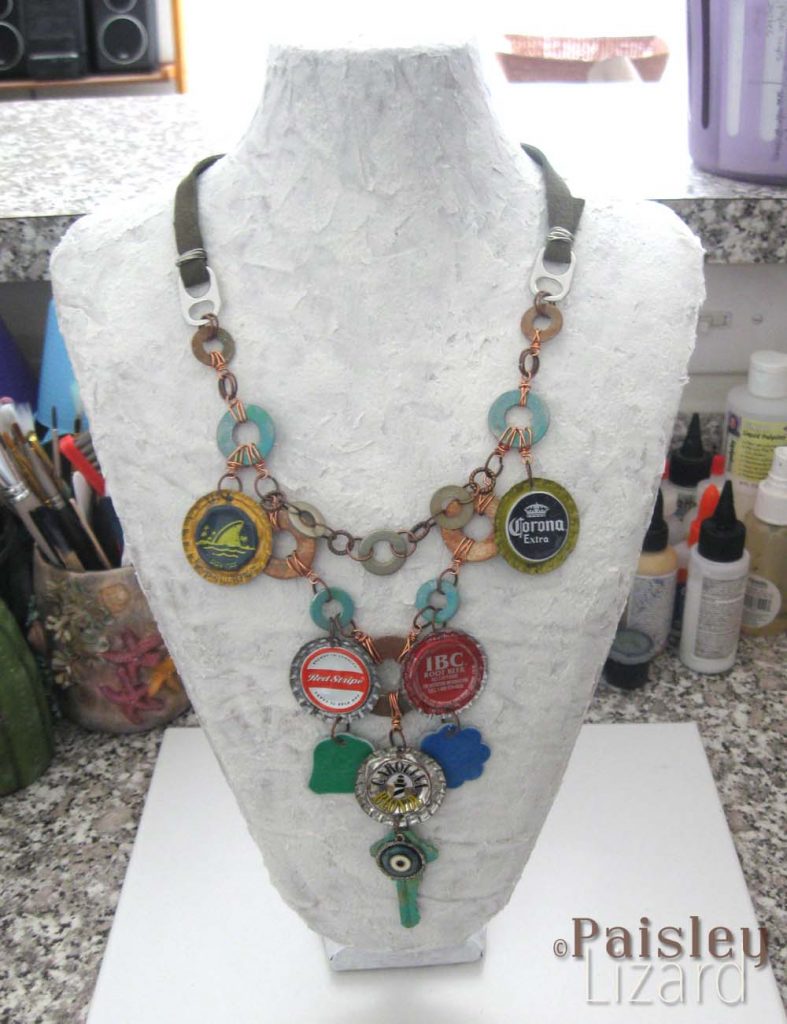
One of my necklace busts received an upcycle makeover for this challenge. I’ve had this white flocked thing for years and it has not aged well. Plus, flocked doesn’t really go with the aesthetic of my jewelry. The repurposing part of this project is that I used about a half-dozen brown paper lunch bags to papier mache over the bust. They’re saved from trips to the sandwich shop where I sometimes get a bagel on my way to work. I was technically saving them to give to a coworker who says she can use them in her compost pile because I think composting is at least one half-step up on the reduce-reuse-recycle ladder from putting them in the recycle bin. I still have plenty left for the worms.
I opted to use a methylcellulose “art paste” from Elmer’s rather than the DIY flour and water paste. I bought it years ago for a project that went a different direction and was able to find it in the craft room on my first try. Shocking. It comes as a pre-measured amount of powder that you dissolve (with a great deal of effort) in water. Four quarts of water. That’s approximately enough paste to cover, oh, I don’t know, about 200 necklace displays. So, I have about 3.9 quarts of goo, I mean glue, left over. Please tell me one of the next Art Elements themes will be something I can use this paste on. Or feel free to stop by my place for a cup or three of paste for your next art project.
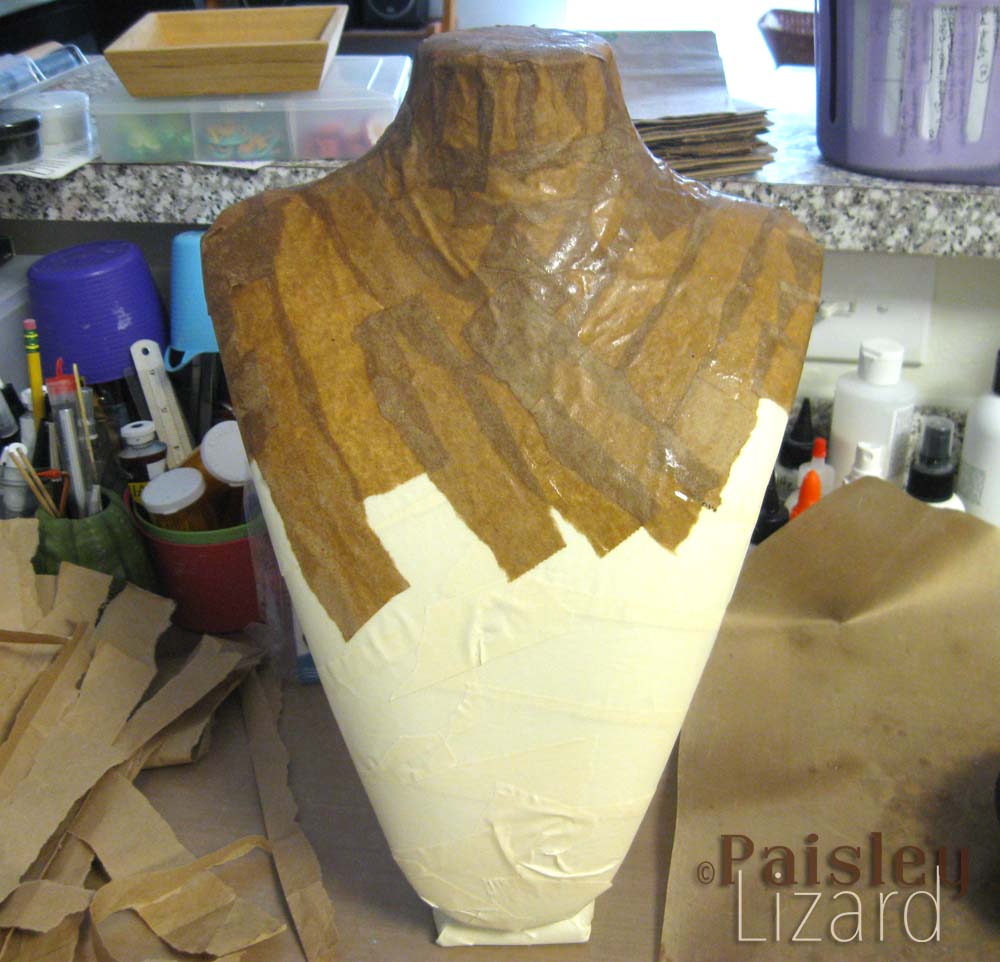
After two layers of paper strips, with drying in between, the display didn’t have as much of a rustic distressed paper finish as I was hoping. I’ve never used acrylic mediums in paintings (because I don’t know how to paint) but I decided to try Golden Fiber Paste to give more texture to the surface of this project. Because I happened to have a jar and it happened to be in the same aspirational art supply storage container as the paste mix, so it must have been fated for this challenge. I have this habit of buying art supplies for aspirational projects and then not getting around to trying them for various reasons. Ask me how many years ago I bought a torch head (but no butane) for soldering (because it was on sale) and whether it’s still in the original packaging. (Fire bad.)
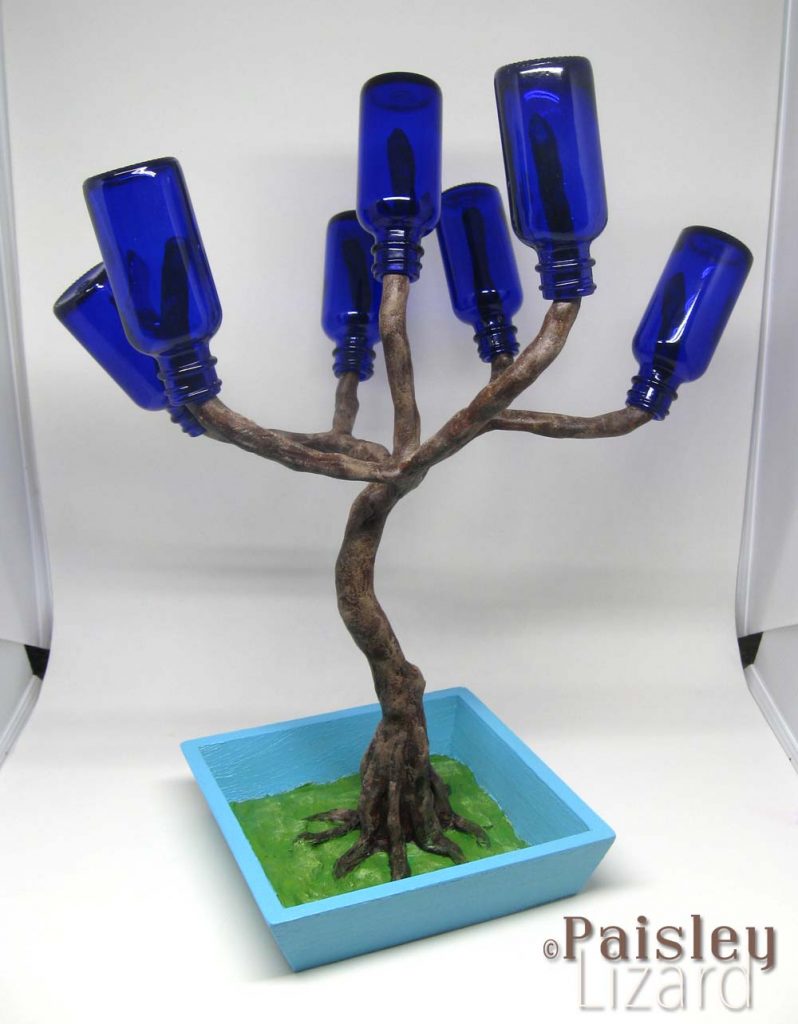
While I was waiting for the layers of paper/glue to dry on the necklace display project, I started my next repurpose project. My grand plan was to make a miniature blue bottle tree using some blue glass bottles that once contained Spirit Essence herbal remedies for my cats. The tree part was going to be copper wire with a patina. Nothing about this project went according to plan. I had moderate success bending and twisting a bunch of 18-gauge wire into a tree shape but the limbs wilted under the weight of the bottles.
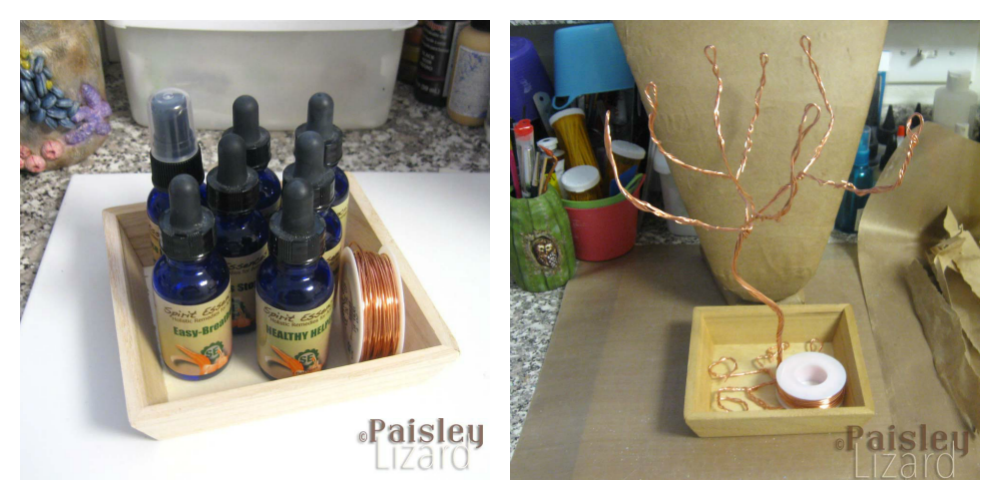
Thicker wire or copper tubing might have worked but I didn’t have any. Polymer clay over the wire would have been an easy solution to firm things up but the tree was too tall to fit inside my oven. I could have ran to the hardware store for some thicker wire, but I was trying not to shop for this challenge. So, I rummaged around my aspirational craft supplies and pulled out some air dry clay. I think I bought it because I was going to make paw print tiles from my cats feet? I’m sure my cats are glad I never got around to that.
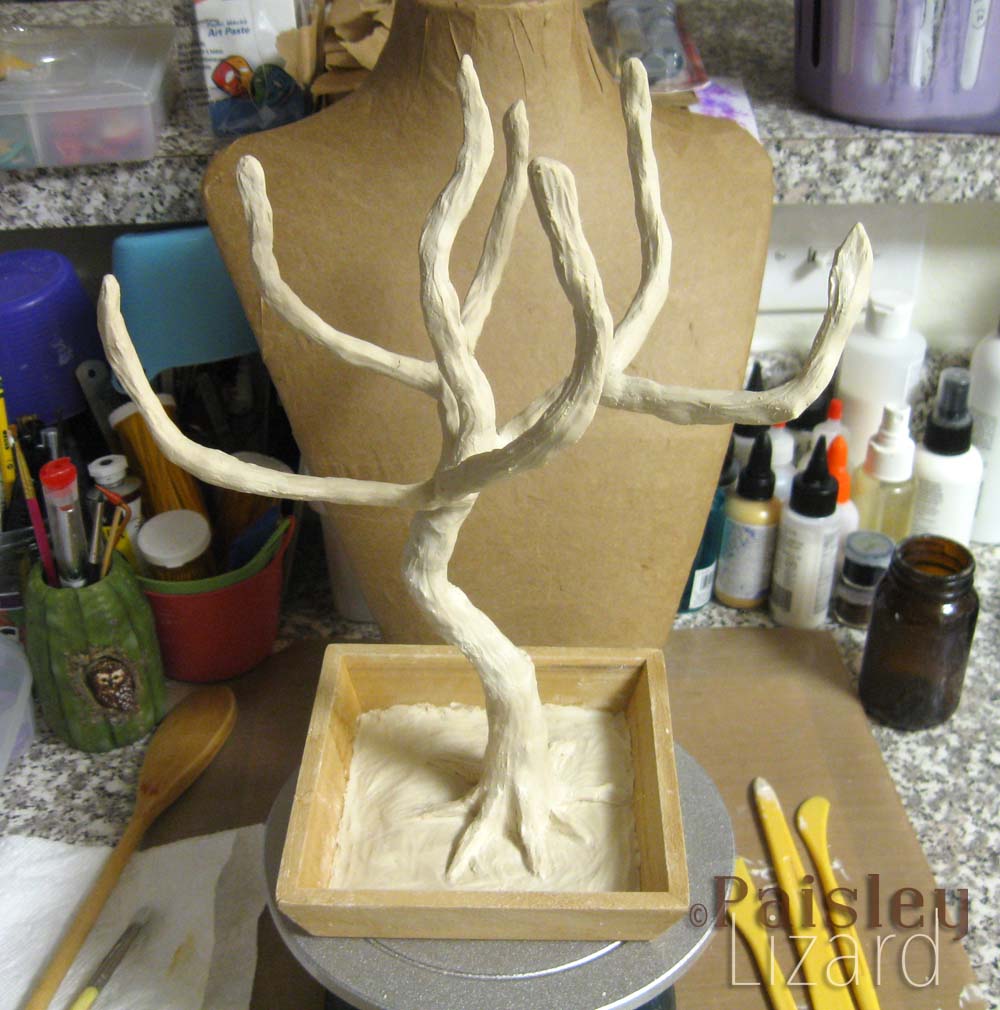
I found it relatively easy to form the clay (which Crayola calls a “natural earth clay”) over the armature and add bark texture with some plastic tools. Feeling rather impressed with my success, I left my tree on the kitchen counter to dry while I did a few chores. On one of my passes through the kitchen to put clothes in the washer, I spotted a crack in the clay on a branch. Upon closer inspection, there were several cracks on several branches. Not worried, I mixed up some slip and began filling the cracks. As I worked, more cracks appeared, almost as quickly as I could fill them. Maybe applying too much slip was mistake number three? I must have spent four times as much time filling cracks as I did making the base sculpture. The slip patches did enhance the rough bark texture though.
After an hour-ish of patching cracks here there and everywhere, I covered the tree with a plastic bag (I read somewhere that helps it dry more evenly) and left it alone overnight. When I removed the bag the next morning, to discover all those cracks reformed and many more newly forming, I nearly cried. I definitely said some NSFW words. Feeling very deflated, I put the bag back over the tree and decided I would wait for it to completely dry and decide how to fill the cracks later. I should have started over right then but I really couldn’t. You know?

What would have been the best thing to fill the cracks and salvage the sculpture? I have no idea and Google was no help. I wanted to salvage the tree because I really loved the shape and texture. The branch tips were already as thick as they could be while still fitting the bottle openings so adding another layer of clay was not an option even if it would have worked. Maybe some dabs of the fiber paste I used on the necklace display? Plain ol’ white glue? We will never know if the cracks were reparable because the now fully dry clay – that was supposed to “dry to a hard solid” – crumbled right off the armature with very little pressure.
At least the armature was still usable. At this point, I broke my no shopping rule and ordered a pound of Apoxie Sculpt. I have a ¼ pound kit in my aspirational supplies (I was going to try making jewelry components with it) but knew that wouldn’t be enough to cover the tree. After some internet research on using this epoxy clay, I gloved up and got to sculpting. I did not love working with gloves on but this stuff is super duper sticky for the first 30-60 minutes. It does, however, wash off with soap and water and a bit of scrubbing if you get to it within the first hour-ish.
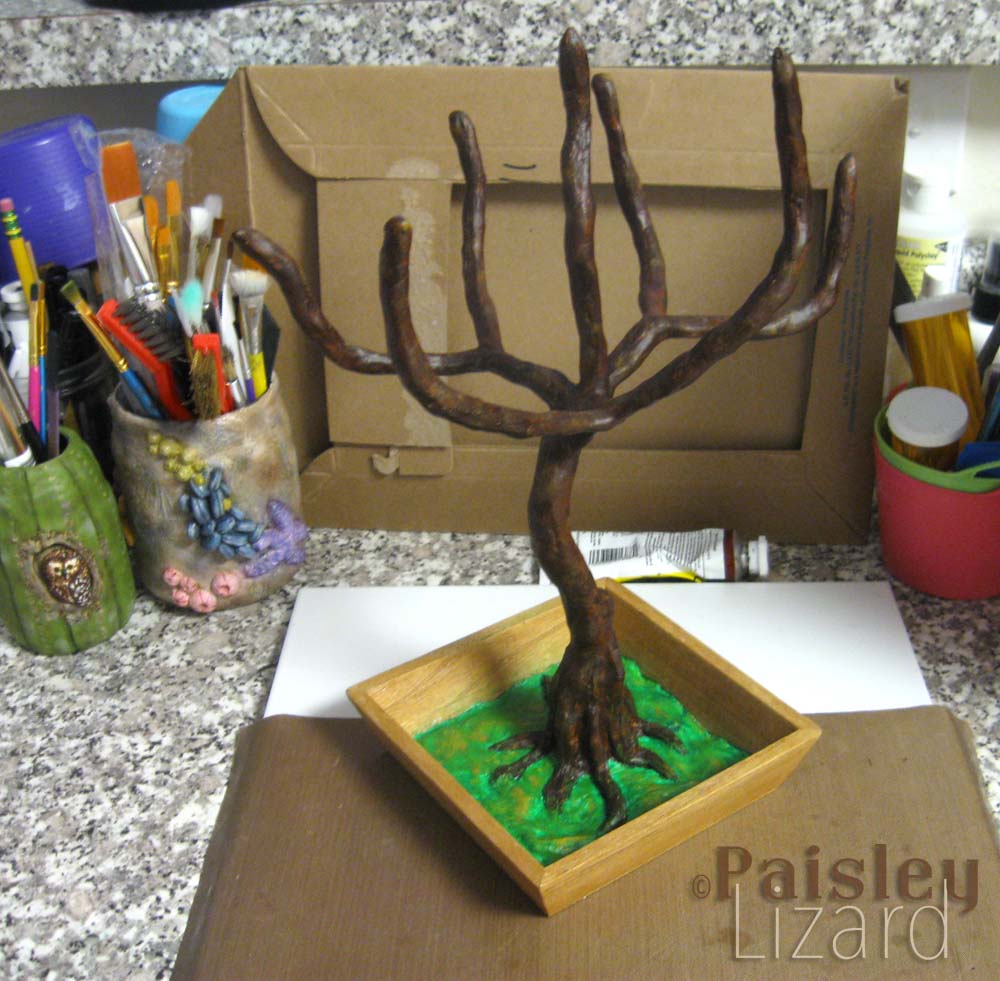
Exactly as hoped, the cured epoxy clay is suitably strong to hold the little glass bottles. It is, however, still breakable, as I discovered when I dropped a half-empty tub of Apoxie Sculpt part A onto it when moving supplies around. Luckily you can paint this stuff even as its curing so I didn’t lose too much time after patching the cracked branch. But I was starting to think this sculpture was cursed. Maybe the evil spirits were trying to prevent its completion because they didn’t want to get trapped in the bottles. They failed, the tree is complete, and my home is now free of evil spirits.
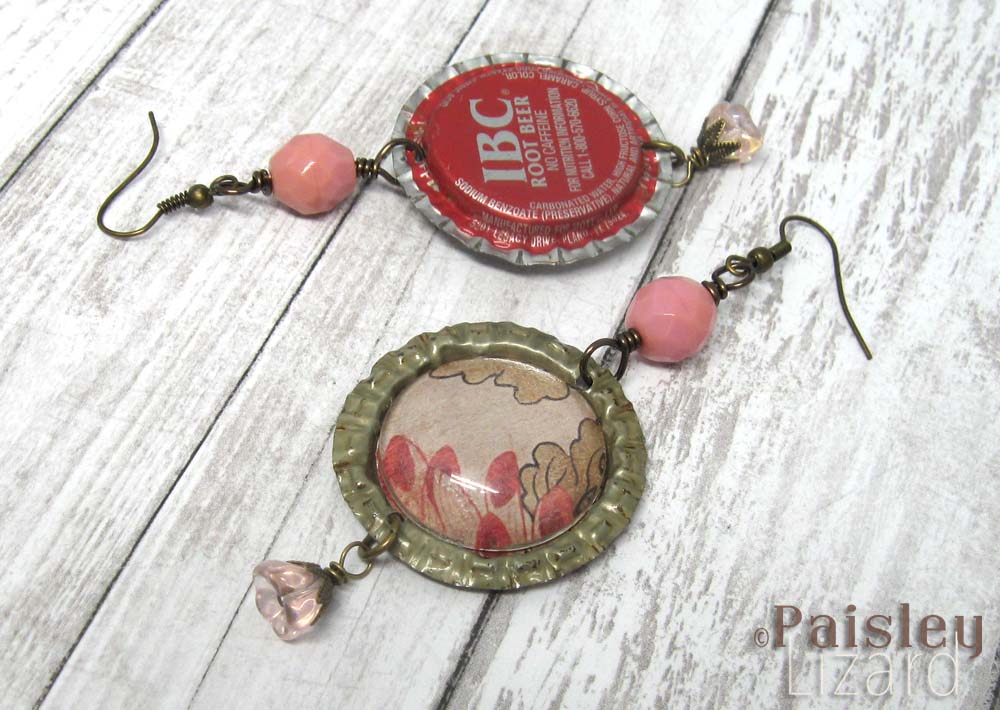
A final project for this challenge was to turn some bottle caps into jewelry. Pounding away at the metal to flatten the caps was instant gratification compared to waiting for glue and clay to dry. Pulling the liners out of the boiled caps, however, involved much frustration and a few drops of blood when I stabbed my hand with the craft knife.
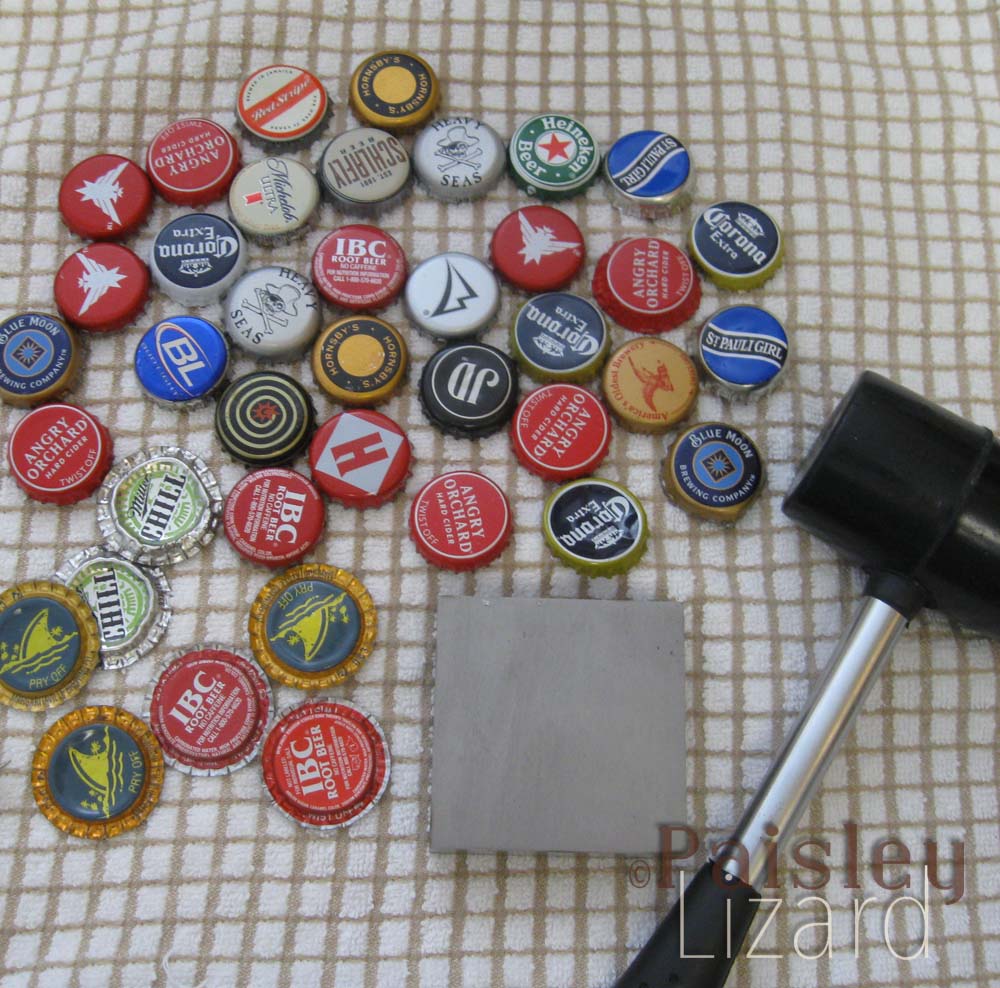
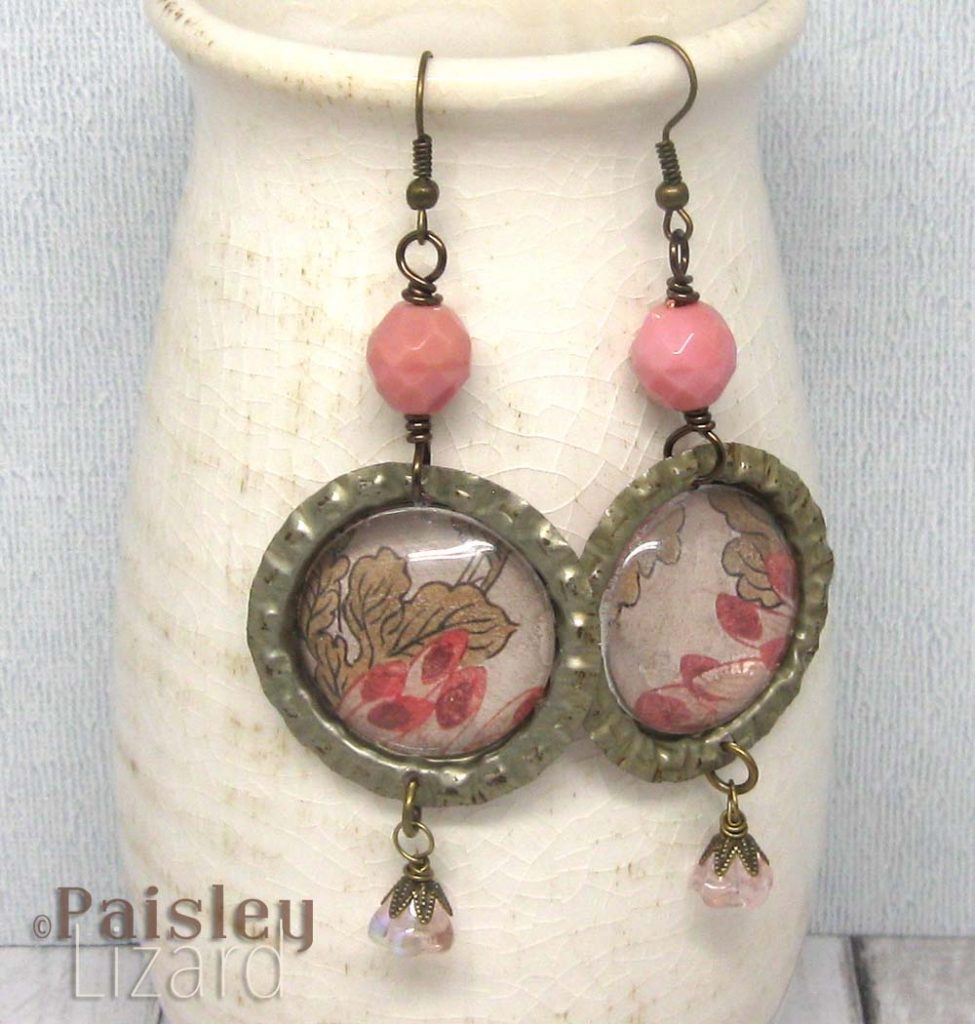
My idea for using the caps was to glue paper circles in the centers and cover with resin. For the paper inserts, I used a circle punch to cut pieces from magazines and catalogs. I coated some of the circles with a couple layers of Mod Podge to seal them. While waiting for the circles to dry – Why did I choose so many projects that required waiting for something to dry?! – I was working on Plan B for the tree, and getting familiar with the epoxy clay. By then, I didn’t have the emotional strength to deal with the capriciousness of resin and ended up gluing glass cabs over the paper for a test pair or earrings.
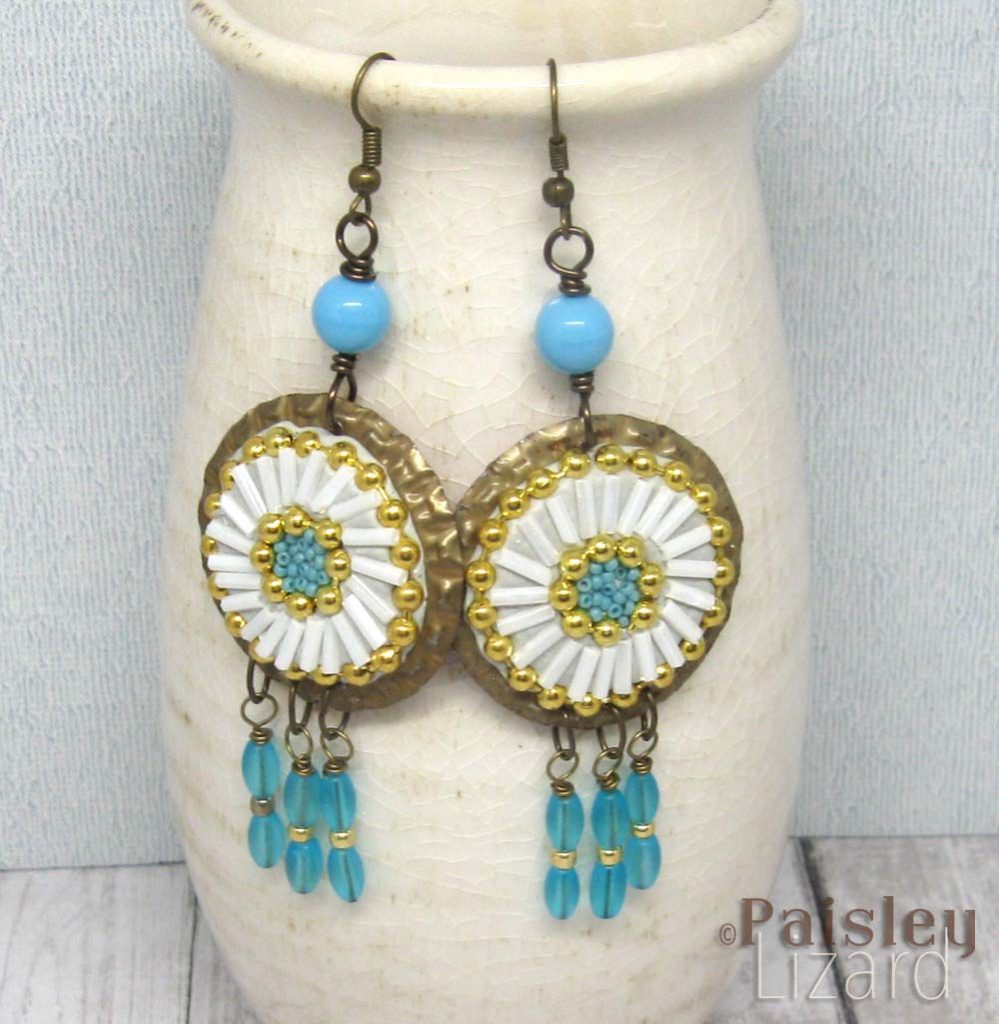
Having had some success using the epoxy clay for the tree, I mixed up a tiny bit more and smooshed it into a couple of flattened bottle caps. There wasn’t really any design plan in mind when I grabbed bits of ball chain and small beads to press into the clay. As I worked, I decided I was too limited by the types of small beads in my stash (bugles and seeds) Clearly, I need to buy small beads in all the shapes I never knew what to do with as a non-beadweaver so I can make many more epoxy clay and bead mosaics.
That’s it from me for this challenge theme. Can you believe I didn’t use any polymer clay? How did that happen? There was a plan to cover a glass jar with polymer clay, and had the bleeping tree sculpture gone according to plan I would have had time to work on it. Despite the frustrations with new media and techniques I barely remember, I had fun with this challenge. While I can’t remember being this frustrated by those childhood craft projects I’m sure I was because I have always been an impatient perfectionist.
Now that you’ve seen my interpretations for this theme, please visit the other participating artists blogs to see more repurposing art projects. Prepare to be amazed at the creativity and talent.
Guests
Tammy <–You are here.
AE Team
You have been busy!! I love the tree, evil spirits and all, I think it worked out fabulously and those blue bottles really are eye catching. The necklace is gorgeous and your ‘new’ revamped bust shows it off well. I was giggling at your cats being pleased with you not getting their paw prints for a ‘fur-ever’ keepsake, I think they would have A LOT to talk about with my cats and the various daft things I attempt with them. I am still planning to one day mix up a lot of water based paint and get my dogs – and cats – to walk through it and walk on a huge canvas but for that I need the right weather, not too hot, not too cold, not too wet, not too dry… as I live in the UK I think my lot are pretty safe from that experiment.. for now!
Thanks so much, Laney. The paint and paws on canvas idea sounds fun. Maybe someday the conditions will be just right.
Oh, you were able to get so many projects done for this challenge! Good for you. I hate that you had so many disasters, but playing and experimenting and seeing what works is all part of the creative process for sure. At least you go to break out some of those unused materials and mark a few things off your “want to make” list!
Thanks so much, Hope. I did get a little frustrated by a few things, but overall it was fun to experiment.
You made some great stuff here Tammy and always so much variety despite the setbacks – I particularly like the dream catcher with the vet tags…we don’t get those here but then I don’t have to do rabies shots for my cat. 🙂 Thank you for joining us in this challenge.
Thanks so much, Leslie. I wish we didn’t have to do the rabies vaccines here. It’s a definite case of over vaccination, especially for house cats.
I always love reading about all your different projects and processes. So many ideas! I love your necklace bust makeover, this is something I also need to do and I would definitely wear your epoxy clay bead mosaic earrings. Fantastic work!
Thanks so much, Karin. I eventually decided I do like those earrings. It took them a while to grow on me.
Your posts are always so entertaining and enlightening! I can’t believe you got that many projects done! I enjoyed the trip down the craft memory lane too! And I save bottles, for completely different reasons but still… loved your post! Thanks for sharing!
Thanks so much, Susan. When I started thinking about all the things I made during my childhood I realized art has always been part of my life, even if never in a formal training way. I’m pretty the first jewelry I made was dried pasta on string. 🙂
I love reading your posts. They are always so witty. I think that you have done enough to cover all the participants contribution to this challenge. The amount of effort that you put in is mind boggling. How do you find so much time? With regard to the neckforms, I once remade mine by covering it with cheap muslin fabric and a bit of modpodge. They looked elegant yet rustic and most importantly clean for atleast 2 years. With regard to epoxy clay,dust talcum powder on your work surface and hands to avoid stickiness. Epoxy clay can be used to stick the bottles to the wire; but you should stick it before painting/colouring the clay. You can texture clay using stainless steel objects for better transference. Its beautiful now but with verdigris it will look gorgeous.
Thanks so much, Divya. I mostly find time to make stuff by avoiding household chores. Thanks for the tips on epoxy clay. I have to set aside some time to play with it again and decide if I really like it enough to make it a regular part of my studio.
Tammy, while I only have one unfinished project done for this Theme, you have 5 or 6 (I stopped counting after the tree) … and most are completed! I’d say you’ve done a good job of accomplishing whatever you wanted to accomplish 🙂 . I really like the suncatcher, and the blue bottles are fab on the tree. I liked the structure white rather than brown though. I remember making a gum wrapper belt and I think my Mom made my dad a crocheted pop top hat! And your way of ‘storytelling’ cracks me up!
Thanks so much, Alysen. I liked the color of the tree made with the air dry clay. If it hadn’t crumbled into pieces, I was thinking of not painting it.
So many fabulous projects. I enjoyed reading through your processes. Even though some were frustrating, they turned out brilliantly in the end! I especially like the paper covered bust and necklace!
Thanks so much, Caroline. The trial and error part of working with new materials and techniques is frustrating because I am goal oriented. I need to learn to enjoy the journey. 🙂
I am always amazed at the number of project that you come up with. I love the bottle cap earrings. Your tree is such fun.
Thanks so much, Kathy. I had fun hopping from one project to another.
Wow. I applaud your innovative spirit. ( Wish I could have spared you the trips and tribulations with the air dry clay. ) Apoxie sculpt is the best – although I find gloves super challenging. My fav has to be the bead mosaic in the bottle caps! But I am so glad you have a tree to show after all that! You totally gave me a HS art class flash back with the Art Paste. ( Keep it in your fridge, but it won’t keep too long… )
Thanks so much, Jenny. I can’t say I enjoyed figuring things out the hard way with new materials, but in the end, I am happy with the tree and the earrings.
You were very busy and very persistent with your clay tree. I am not so sure I would have been able to keep going but it turned out great! I think my favorite is the pair of mosaic earrings. I am really inspired by these and want to give it a try myself.
Thanks so much, Cathy. The tree project sort of became a battle I had to win once I invested so much time in the first version. I think I have to make more of those earrings – pressing beads into the epoxy clay was too fun.
Wow you made a lot! I love that you did not give up on your tree project, most of what I make is trial and error and a lot of creative thinking! I LOVE the sound of a copper tree with a blue-green patina, that sounds amazing!!!
Thanks so much, Niky. Sometimes I give up when a new thing doesn’t seem easy but this time I was determined to make a tree. It’s sitting in a nook in the hallway and each time I pass it I think “you’d look better in copper” so I guess I need to get on that.
I am really sorry for your trials and tribulations. Please don’t hate me for laughing about your description of the paper clay. I wasn’t laughing about your experience, just the writing about your experience. I have some paper clay in my studio that was originally going to be snowmen in a glass ornament (? I think…?) so thanks to your experience I know to never attempt large sculpture with it. After all that, I think your tree turned out fabulous. I also really love the bottle cap earrings. Definitely try again with the resin and shop for more beads for the epoxy because I love the direction you’re heading with those. Oh, and I’m not sure we can come up with a theme that will result in you needing 3.9 quarts of glue…LOL!
Thanks for participating in another challenge.
Thanks so much, Jen. Your air dry clay may work better than what I used. I’ve seen quite a few YouTube videos of people making things with paper clay and they seemed to turn out fine. I’m really not sure how much of the problem was user error versus the product. (I bought more small beads so now I just need a theme to get me inspired to create more mosaic jewelry.)
Seems like both you and I made projects that needed a lot of drying time. 🙂 Your wall art dreamcatcher is lovely, and something that I might try out for swapping out an old macrame piece from my wall. I love the makeover of your photo prop! It’s surprising that it’s springy / squishy though, you may be right that it’s because of the glue. Your adventure with the blue bottle tree had me biting my nails while I read as fast as I could, and I’m really glad you have a working project now. As for your earrings, I love the beady ones even if you’re not sure about them – I imagine it must be fun pressing tiny things onto clay!
Thanks so much, Anita. I didn’t mean to write a suspense novel but I think I needed the catharsis of sharing the details of the experience. It was definitely fun pressing beads into the clay and I definitely plan to do more.
What a funny read and so many projects! I love all of them and how you didn’t only have the patience to persist with the tree but also to tell us all about it 🙂
Thanks so much, Rozantia. I was a woman on a mission with that tree, determined to make it work.