 My newest jewelry-making technique involves a bit of chemistry and physics. I gave metal etching a try this month. Etching and electroforming are the techniques featured for the Self-Representing Artists in Jewelry Design challenge in August.
I began researching etching weeks ago, and decided on salt-water as my etchant almost immediately. My studio, which is sometimes otherwise known as my kitchen counter and dining table, is not equipped for harsher chemical techniques that generate more toxic fumes.
I reviewed about a half-dozen different tutorials before getting underway. And then I went shopping for the materials, most of which were available from the grocery or craft store. The one thing I ordered was a D-battery holder. And then, thanks to a fellow SRAJD member, I saw a tutorial that showed how to convert an ac/dc adapter to a power supply. That’s a project for next time. Because I like the idea of not generating all those waste batteries.

This is almost everything you need to get started with salt-water etching on copper. A plastic container for the salt water, salt, battery, battery holder, copper wire, scrap copper, copper blanks, and ink. Not shown: the water.
Every tutorial I reviewed indicated you need a saturated salt water solution for your etchant. That’s a very simple thing to make. Heat some water (simmer will do fine, no need to boil) and stir in salt until it stops dissolving. For my project, I used a 750 ml plastic container, with about 500 ml of tap water and somewhere around 200 g of Kosher salt. The measurements don’t have to be precise.

This is my saturated salt water solution. You can see salt crystals floating on the surface and around the edges of the pan.
As I stood at the stove stirring and pouring salt, making the saturated salt water solution, I grew nostalgic for those magnetic stirrer set-ups we used in chemistry lab. (Did you know you can get them from Amazon? Oh so tempting.)
Prepping the metal to be etched was also simple. I cleaned the copper blanks and the scrap copper. Then I used ink and a rubber stamp to put a design on the blanks. The ink acts as a resist to the etching. In other words, the inked parts will be raised on the finished piece.
I was a little worried the ink wouldn’t work. Because in one of the video tutorials I watched, the instructor said the ink wore off after about 15 minutes. That didn’t happen to me. My ink stayed on for the entire etching and until I cleaned it off.

This is a copper blank with a design applied using a rubber stamp and black ink. I recommend the clear stamps you use with an acrylic block, so you can see what you’re doing. I filled in some spots with a Sharpie marker.
My etching didn’t get off to a great start. When I hooked my battery up to the copper wires there was no bubbling. If everything is set up properly, bubbles should form on the scrap copper, to let you know current is flowing and etching is in progress. No bubbles means something is amiss.

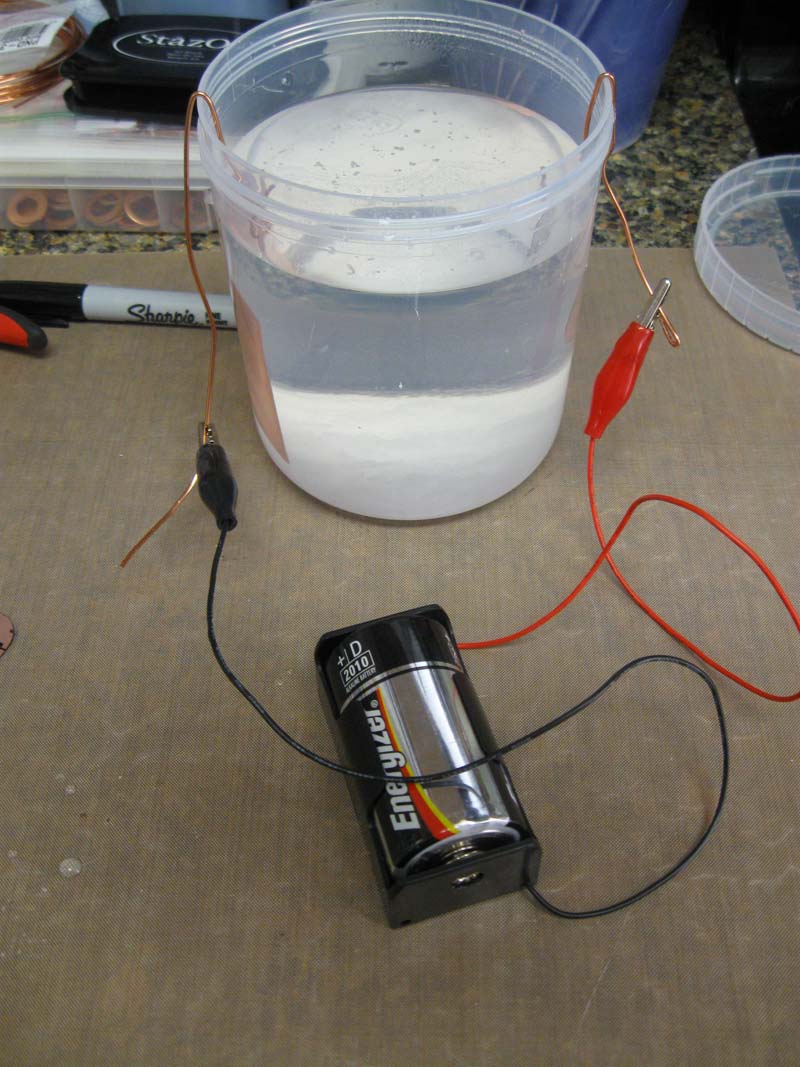
This is my etching set up. The scrap copper is connected to the negative (black) lead on the battery and the piece to be etched is connected to the positive (red) side of the battery. Both pieces are fully immersed in the salt water and suspended from copper wires.
I tried changing the battery, several times. Still no bubbles. I was convinced the battery holder was faulty. I mean, this set up isn’t rocket surgery and there are only so many things you can get wrong. Luckily, my handy man came to the rescue with some wire stripping pliers and voila …bubbles! They make a soft fizzy sound, like pouring soda into a glass.

Look at the bubbles forming on the left side! They mean my etching is underway. You can also see some copper beginning to go into solution, turning the water orange.
Another thing every tutorial I reviewed had in common was indicating the etching would take about an hour. I lifted my copper blank out of the solution after about 30 minutes to check the progress. It was difficult to tell if anything was happening to it. But I knew copper was being drawn away because the scrap piece was getting crusty and the water was completely orange.

This is what my salt water solution looked like after about an hour. Lots of copper dissolved in there. You can also see some salt residue on the negative (black) lead from the bubbles popping near the surface.
I let my etching go on for about 90 minutes total. By then, the piece of copper wire suspending my blank was nearly dissolved where it was in contact with the blank. Some tutorials recommend using 14 ga or larger wire. The largest I had was 18. No big. You can take your blank out of the solution and replace the wire if you need to keep etching.
My first piece was a success. The etch is not super deep or crisp like you might get with other chemicals, but it was distinct and looked like the design I had stamped in ink.

This is my first etched piece of copper. Most of the ink wiped off as I was rinsing it. I had to use a little alcohol to clean the rest.
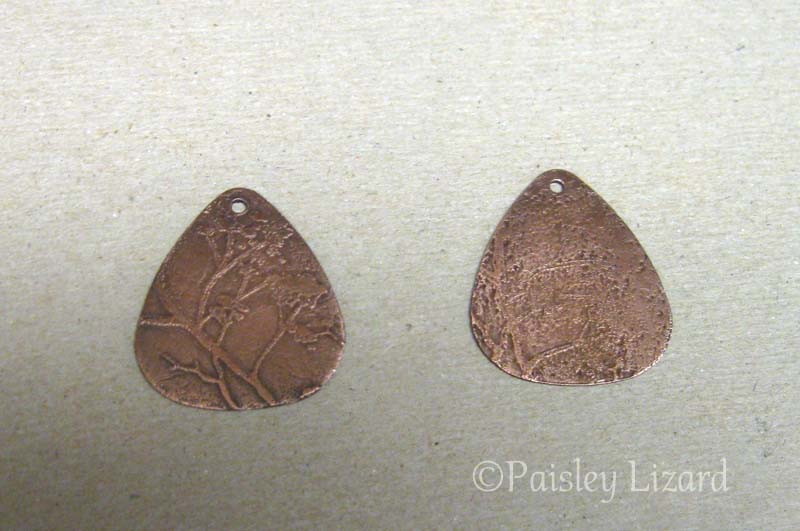
My second piece didn’t turn out well. At all. At least one tutorial indicated you can re-use the salt water solution, even with all that copper dissolved in it. I put in a fresh battery, just in case, and put my second blank in. I left it for the same amount of time as the first. And I got lots of pitting and a very messy etch.

The blank on the left was the first one etched. The piece on the right was etched second, in the same solution. There was lots of pitting on the second piece. Note these were both dipped in liver of sulphur to highlight the etch.
I don’t know for certain that re-using the solution was the cause of the pitting. But just to be safe, I mixed up some fresh salt water and tried again with a new copper blank. The results were similar to the first piece, with a distinct design and very little pitting. In fact, the third piece came out even better than the first.

This is the third blank I etched, using fresh salt water solution. You can see that the ink held up for the entire 90 minutes. And the wire got noticeably thinner where it was in contact with the blank (at the lower bend).
I might experiment with re-using the solution. One tutorial suggested adding a little citric acid (which you can get from the canning section of a grocery store). And one suggested aerating the water, with an aquarium pump. Perhaps one or both of those would minimize the pitting?
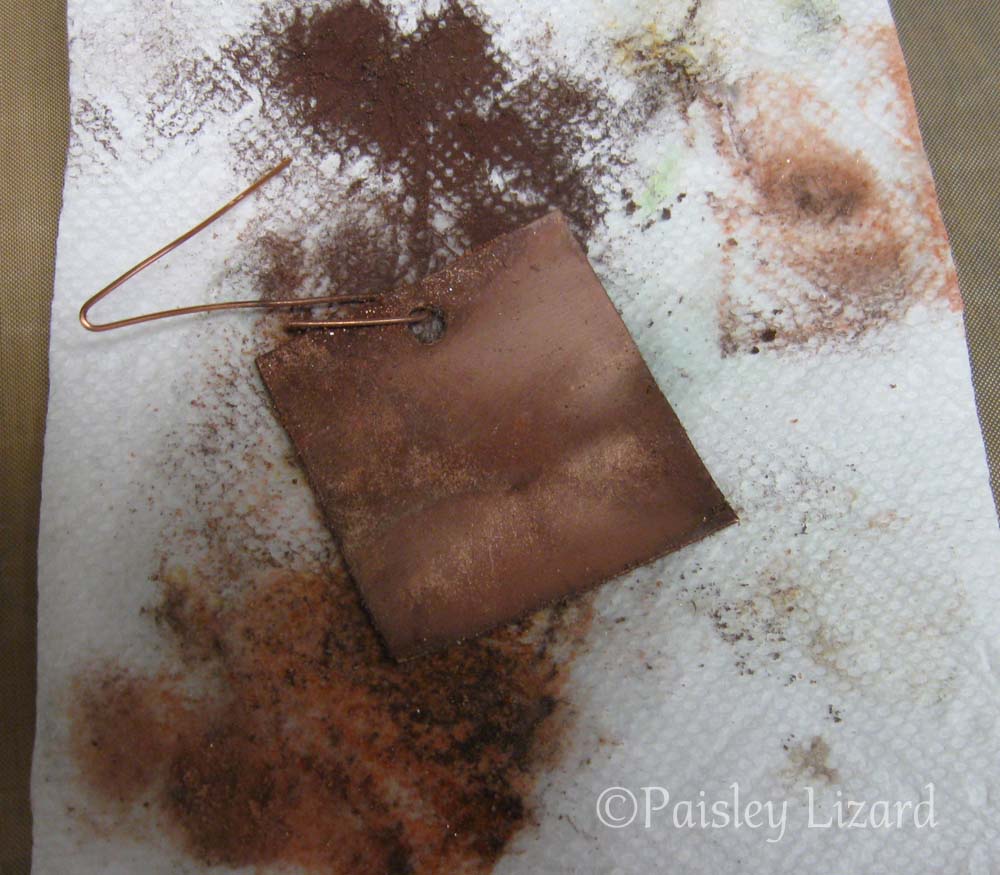
I know I can reuse the scrap copper. It was pretty crusty and messy looking after the first etching, but also very easily cleaned up. Most of the copper salt wiped off with a paper towel.

This is the scrap copper after the first two etchings. I wiped most of the copper salt off with a paper towel, and then cleaned the rest with steel wool. It’s all ready to be used again.
After I cleaned up my two usable blanks, I highlighted the etch with a liver of sulphur patina. And then I was ready to make some earrings. I saved the pitted messy blank and will probably see what happens when I add some Iced Resin enamels to it.
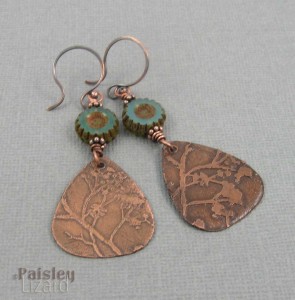
For the earrings, I added some green Picasso-finish Czech glass flower beads and copper rondelles as accents. They’re hanging on patinated copper wires.

My etched and patinated copper blanks are now the focals on a pair of earrings. The one on the left was the first piece etched and the one on the right was the third piece etched.
I’m quite pleased with my first etching attempts. I’ll definitely be doing more of this in the future. It apparently also works on brass. The two etched copper focals didn’t turn out exactly alike. One has a deeper cleaner etch (and a slightly darker patina) than the other. I like them both. And I think they make an interesting pair of rustic earrings.
Edited 31 August 2015. Please note this is not intended as a tutorial. I encourage you to review the links I’ve shared, or do your own search, for the detailed steps. Also note that salt water etching is still a chemical process. Appropriate safety precautions include protecting your eyes from splashes. And those bubbles are hydrogen gas. Not a lot for a project this size. But if you were doing this on a larger scale, you might want to consider appropriate ventilation. Just in case.

Interesting. Something I have been meaning to try. I really like the finished pieces.
Thanks, Dix. Except for the part where the leads on my battery connector weren’t making good contact, the process was super easy.
Tammy, I’ve been wanting to try salt water etching for a while. It is one of my goals for this fall/winter season. I am so glad to hear, from a person I actually know, that the process is easy. Thanks for sharing.
You are most welcome. Lee. I’m always happy to share the results of my experiments and adventures in jewelry making. 🙂
Great tutorial! Thank you for sharing your experience with salt etching. I’ve only used the chemicals, but like the idea of just using salt for copper. I just bought a rolling mill and if you create an etch on copper you can then use it to roll on to silver! Hmmmm…. I’m just going to have to find time to do this.
Thanks again!
It’s more of a report on the results of my experiments than a tutorial. I left out a few details, like you need cover the back of the project or it will get etched away. But those tutorials I linked in the post have all the steps explained.
Great blog post, thanks for sharing your results. I etch with the Edinburgh Etch technique, but I like that salt water is much less toxic. Maybe I will give this a try too!.
The etching solution turns into something a little less benign than salt water once the copper starts dissolving. But on the scale I was working, I didn’t have to worry about build up of fumes or gases. So, that makes me happy.
These earrings turned out beautiful. Thank you for sharing the process behind your hand-made work. This is something I’d like to try one day!
Thanks so much, Renee. It’s definitely one of the most fun jewelry-making techniques I’ve tried so far. Not counting that one time I used a torch to make a piece of silver wire ball up on the end.
Awesome blog post! Welcome to the world of etching. Can’t wait to see what else you do with this technique since your first attempt is frikkin’ amazing!
Thank you, Laura. Especially for giving me the inspiration to try this technique as part of the SRAJD monthly challenges. I think I’m hooked. Let’s hope the first time wasn’t a fluke of beginner’s luck and future attempts turn out equally well.
Hi Tammy – You got great results! I think you’ve inspired me to try salt etching, too. I have a “theory’ as to why the same solution did not work so well the second time. As you said you had to wipe copper salts off the scrap copper. This leads me to believe that your saturated salt solution was no longer fully saturated, which may account for the wonky results. Now I’m thinking of ways to test this…
Thank you, Louise. There would definitely have been some depletion of the electrolyte solution after the first etch. Which is why I am skeptical that the solution can be reused indefinitely as was suggested in one video I watched. As the solution gets depleted I would expect the etch to take longer, or stop working.
My theory on the pitting is that there was a lot of “gunk” (salts) suspended in the water after the first piece and some of it was coating the project and interfering. Or not. Maybe both theories are involved. Idk. I plan to try reusing, but let the salts settle to the bottom first. If you do your own experiments, I hope you’ll share the results.
What wonderful results. I really do like the 3rd try, and can only imagine that you’ll have a great time experimenting with other designs. While I’m not a jewelry maker, I totally love viewing your tutorials. Thank you 🙂
Thanks so much, Deb. I’m glad you enjoy reading about my adventures in jewelry making. 😉
I sure do and it inspires me to stay with making skin care products 🙂
very interesting! way to go!
Thanks, Nike.
You did a marvelous job! It looks just like a nature print! It’s great to know the ink worked, painting the design on w/ nail polish was difficult, I couldn’t get the fine detail I wanted. Can’t wait to see your next installment!
Thanks so much, Teresa. I’m glad the stamped ink worked too. My hands are not steady enough to paint little details.