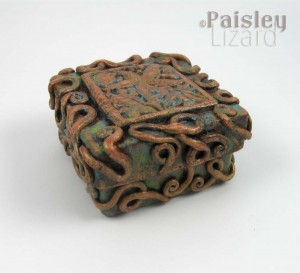
 I’ve been experimenting with some mixed media recipes to create a faux copper patina effect on polymer clay. I love copper. And I especially love copper with a patina. Those splotches of cool turquoise blues and greens on the warm reddish metal. Yum.
Shiny copper, like the color of a new penny, is pretty. But some things just get better with age, and copper is one of them. I love rustic crusty grungy looking things. Things that look lived in, weathered, old.
I’ve seen some spectacularly realistic faux copper patina effects on polymer clay done by other artists. I don’t know how they do it but I wanted to create a similar effect for some of my jewelry. These are the results of my first experiments.
Sure, I could have used some chemicals (or heat) to put a real patina on actual copper. But as I don’t have the tools to create beads and things in the shapes and sizes I want, I’d be limited to what I could purchase from other artists or suppliers. And did you know patinas on metals can wear off? Yep. True story.
Because polymer clay is exceptionally good for mimicking so many other surfaces and substances from leather to glass, it was a natural choice for my experiments. It’s also inexpensive, which is a plus for the error part of “trial and error” experimentation. It doesn’t require specialized equipment or training, it’s non-toxic, and it’s very malleable. You can shape it into almost anything and use it cover any surface that can be baked at the curing temperature of the clay.
The Experiment, Part 1. I started my experiments with some beads. I won’t be telling you exactly how I made the beads. Because I got the idea from the Rustic Beads and Components tutorial by Ginger Davis-Allman of The Blue Bottle Tree. If you’re interested in making your own rustic beads, I highly recommend the tutorial. No, it won’t tell you how to make my exact beads. These are my own recipe. But it will tell you how to make some fabulous rustic beads of your own.
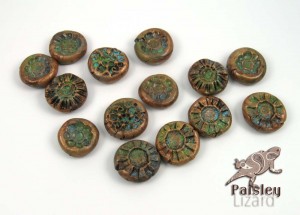
My tester beads came out exactly the way I was hoping. I haven’t used them in jewelry yet, but you can be sure you’ll see some designs with them in the future.
To make my tester beads. I started with some copper colored clay. I used Premo! Accents in copper, straight from the package. I didn’t condition it thoroughly because I wanted my beads to crack a little here and there as I shaped them. I wanted the shapes to have lots of texture, big and small. Nooks and crannies and cracks and crevices to make them look worn and weathered.
After shaping the beads and piercing holes, I baked them at the recommended time and temperature on the package. Once the beads cooled I started adding the patina. And by “cooled” I mean they weren’t too hot to handle. I am impatient and didn’t wait for them to reach room temperature.
My patina recipe uses three colors of acrylic paint, applied according to the technique in the aforementioned tutorial. (You really should get the tutorial. You won’t regret it.) I started with a dark brown-ish black as my first layer. Copper doesn’t always oxidize to a dark color before it develops a patina, but when it does? Yum. The darker antiquing also serves to highlight the next layers.
The next layers of my patina recipe were blues and greens. Once those layers dried, I sealed the beads with gloss polyurethane. The water-based kind, of course. I could have used matte polyurethane for a grungier finish. Or wax for a more burnished look. But I wanted the un-patina-ed copper parts to really shine for emphasis. And then I popped the beads back into the still warm oven to seal the deal.
The Experiment, Part 2. For my next trick, er, test, I grabbed a paper mache box. I’ve been re-stocking the keepsake box section of my Etsy shop. I’d been focused on hearts and roses …for Valentine’s Day, which is just around the corner. These rustic beads and things were just the break I needed from all the pretty sweetness.
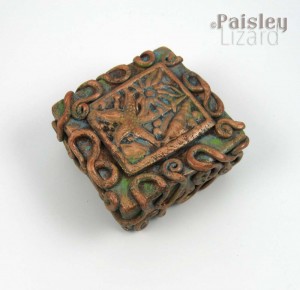
This little square box has a sea life motif. I think the faux copper patina – and the squiggle shapes all over – make it look like something recovered from a shipwreck.
This little crusty rustic sea life box is formed over a paper mache base. You can make polymer clay containers and vessels without forming them over a base. It takes a bit more effort. And skill. And time. And patience. At least two of those are things I usually have in short supply. Can you guess which?
Anyhoo – I coated the little box in a thin layer of glue. Good ol’ Elmer’s multi-purpose white glue. This is an important preparation step as it helps the raw polymer clay stick in place as you are covering the box, and it helps the clay bond to the box as it cures.
I first covered the box in a thin layer of copper clay. I textured that layer. I next used a silicone mold I made to shape the little sea life motif for the lid. And then I rolled out some thin snakes of clay and squiggled them all over the top and sides of the box. All that got textured too.
As with the beads, the box was baked according to the directions on the polymer clay package. No worries the box would burn. Paper is perfectly safe at 275 degrees Farenheit. (Think about the parchment paper you use to line your cookie sheets.) Again, I didn’t wait for the box to cool completely before beginning to apply the layers of patina. I used the same basic steps as for the beads, right up to an including the gloss polyurethane.
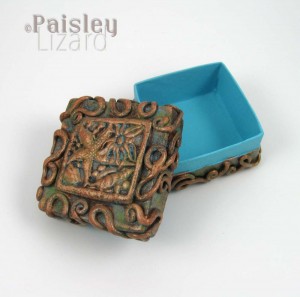
The inside of the box is not covered with polymer clay. The lid wouldn’t fit if I had done that. Instead, I used a coordinating blue acrylic to paint the inside.
Note that only the outside of the box is covered with polymer clay. If I had covered the whole thing, inside and out, the lid wouldn’t fit. I gave the inside of the box a nice finish with a couple of coats of acrylic paint in a coordinating blue.
And then I remembered I had a lizard mold. Which I made from two-part silicone putty with an old broken earring. I also remembered I had a paisley texture sheet. Somewhere. Cue the scavenger hunt in my craft supplies. And voila! A paisley lizard faux copper patina keepsake box. My faux copper patina piece de resistance.
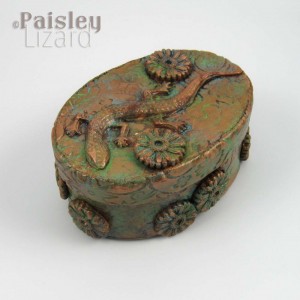
This has to be my favorite thing I’ve made with polymer clay. It’s got so many things I love, from a lizard and a paisley design to the colors of copper patina.
Of all the things I’ve made with polymer clay since I first discovered it over 10 years ago, this little lizard box has to be my favorite. In case you didn’t know, I adore copper. And lizards. And paisley. And rustic aged-looking things. What’s not to love?

I didn’t sign any of my original polymer clay pieces made over the years. I’ve recently started adding my name (or my business name, rather) to the backs or bottoms of pieces, with a rubber stamp. You can see it here near the edge of the box bottom.
The Experiment, Part 3. As I am a fan of practically any distressed, weathered, aged, oxidized metal, I decided to try another test recipe. This time I was going for rusty iron. I only made two test beads. Why only two? I’d been playing in the studio all day and my furry four-legged staff were demanding food and playtime. So I quickly grabbed two blobs of clay and shaped some beads to add to the batch going into the oven.

My rusty iron recipe wasn’t as great a success as my copper patina. I’ll keep experimenting with this one.
While I do like the grungy distressed look of these beads, the effect is not quite what I had envisioned for rusty iron. So, I’ll keep working on this recipe. And studying images of weathered metal for more inspiration. After rusted iron, I’m thinking bronze patina. And then, why stop at metals? Why not some weathered wood? And why stop at colors? How about some ancient crumbling stone textures? There’s really no limit to what can be imitated with polymer clay.
To Be Continued. There is, however, a limit to how much time I can spend playing with polymer clay. So, this is the end of my mixed media and faux patina offerings for today. I hope you’ll stop by again, to see whether I can perfect my rusty iron recipe, to look at new jewelry designs, and other creative adventures. You can subscribe to this blog by email or feed servers so you won’t miss a thing. The links are all in the side bar on my blog page. You can also follow me on Facebook and get my Twitter feed to keep up with what’s new from the Paisley Lizard.

Amazing Tammy! I was dying to know how you made these amazing copper pieces! Thanks for sharing!
Thanks, Brandy. And you’re welcome. It’s really nothing anyone who’s a pro at polymer clay wouldn’t figure out from the photos. But for me, it was an accomplishment to get the look I was hoping for on the first try. Except for the iron. That’s a work in progress.
I am loving these copper patina effects Tammy! Great job!
I have Ginger’s “Rustic Beads” tutorial too and it is A.W.E.S.O.M.E!!!
From the looks of it, I think that you’re ready to start doing your own polymer clay tutorials too 😉
Thank you, Marica. When I have something really unique for a tutorial I might give it a whirl. Ginger has set a pretty high bar for what a good one looks like. 🙂
Beautiful job! Love the lizard box. Thanks for sharing all that info. The glue is a great tip; did you let it dry before applying the clay?
Thanks, Miriam. Sometimes I let the glue dry before applying the clay. Because I’m not working as quickly as I planned. It doesn’t seem to matter much either way for the final piece. But with some of the smoother, less sticky clays, it does help to have the glue a bit tacky when applying clay to the sides. Keeps it from sliding off before I get all the way around.
These look pretty amazing.
I also very much agree with you on preferring the look of certain types of metals after they’ve weathered a bit. (I always prefer my silver with a bit of tarnish. Sometimes a lot. Depends on the object.) I have a ring I’ve been wearing for over 20 years, and someone offered to polish it for me once….)
Things with character make me happy.
I love the lizard box, especially. Seems fairly well perfect.
Thanks so much. I wonder if one reason I like rusted, weathered, distressed things is I don’t have to polish them? I enjoy polishing about as much as dusting or ironing. 😉
I am very much with you on the liking polishing as much as….
However, Mister Tea does our ironing, when it needs be, I dust… when needs be, and he helps sometimes.
For metals, though… I would go with “I prefer character in my pieces, and really, it helps even more. Because they look cooler AND don’t take extra work!”
Love your Lizard box and beads!! I just got the same tutorial and others on polymer clay from The Blue Bottle Tree. Will have to watch them Today…!! Even though you do learn a technique from a tutorial, you still have your own pretty style!!
Thanks so much, Mary. I have several of Ginger’s tutorials and they are all fabulous.
Love it! Love the box! I just recently dug this tutorial back out! It was very fun, mess fun, my favorite kind of fun. 😀 I finally got a batch that I am happy with. Practice makes progress. Thanks for sharing!
I love the effect you achieved with these! The boxes are brilliant and the tester beads in both the copper and the rusty iron are so very cool! When I have some spare cash I’ll have to purchase this tute from Ginger… but her faux roman glass one is probably next on my list… so many great choices, so hard to decide! 😉
Thank you so much, Beth. It is tough to choose which of Ginger’s tutorials to get. Every one I have is awesome and the only problem is not enough time to explore all the possibilities in them. I have the glass tutorial but haven’t tried the roman glass part yet. Or the beach glass. But the carnival glass was fun, and I still have colors I want to try.